Anything can go here, in any language... except my native language Sinhala. Be cool... anybody is warmly welcomed! :)

Showing posts with label programming. Show all posts

[JIRA Administration] How Groovy scripting makes your life easy

In my last blog post I insisted that everyone should learn how to code. If you are a JIRA administrator who would like to do some advanced sort of stuff, keep reading, you'll find out how a little bit of coding can help marvellously. I have a limited OOP background, in fact I've never been a Java programmer, so I find having to deal with this sort of things very exciting.

I wanted to do some cleanup of a huge JIRA instance that has been bit messed up with a LOT of schemes (workflow, issue type, field configuration, etc.). Something I learned from my past experience is, per-project schemes in JIRA is a very bad idea. It affects the manageability of the JIRA instance when it grows. When it comes to duplicate Field Configurations in JIRA, it is extremely difficult to find them by hand.

Normally I would query the database to identify the duplicate schemes in such cases, but when I wanted to see how many duplicate JIRA field configurations exists, Oracle SQL met a likely dead end.

Here's the first SQL query I used:

SELECT
  FL.NAME FIELDCONFIG,
  LISTAGG(FLI.FIELDIDENTIFIER || ISHIDDEN || ISREQUIRED || RENDERERTYPE, ';') WITHIN GROUP (ORDER BY FLI.FIELDIDENTIFIER || ISHIDDEN || ISREQUIRED || RENDERERTYPE)
FROM
  FIELDLAYOUT FL,
  FIELDLAYOUTITEM FLI
WHERE
  FL.ID = FLI.FIELDLAYOUT
GROUP BY FL.NAME;

ORA-01489: result of string concatenation is too long
01489. 00000 - "result of string concatenation is too long"
*Cause: String concatenation result is more than the maximum size.
*Action: Make sure that the result is less than the maximum size.


My plan was to list-aggregate each field's configuration against field configuration's name, and then use SQL "having" clause in a parent query to find out duplicates. This didn't work due to the limitations of Oracle's "listagg" function. Of course a custom "listagg" written in PL/SQL could have helped, but I didn't want to create any additional objects in the database. Also, I wanted to do something that I have never done before. Thus it came to Groovy.

First you need the JIRA Script Runner add-on (in my case it was already there). This add-on provides a Script Console in which you can code Groovy. It doesn't come with a handy IDE, but just a basic code editor. Serves the purpose.

If you execute the following one line piece of code there, you'll see how simple it is. It's based on Java, but lot more simpler to use. If you are scared of OOP like I used to be, here's your chance to practice by swimming in shallow freshwater.

"<h1>Hello World!</h1>";
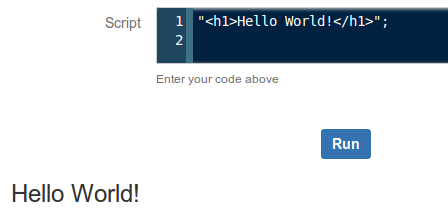
It will do neat HTML!

Here's the piece of code I wrote in Groovy. I'll explain how it serves the purpose as well.

import com.atlassian.jira.component.ComponentAccessor;
import com.atlassian.jira.issue.fields.layout.field.FieldLayoutManager;

log.setLevel(org.apache.log4j.Level.DEBUG);

FieldLayoutManager flm = ComponentAccessor.getComponent (FieldLayoutManager.class);

x = flm.getEditableFieldLayouts();
html = "< table>< tr>< th>Field Configuration< /th>< th>HashCode< /th>< /tr>";
x.each {
 l -> k = l.getName();
  v = l.getFieldLayoutItems().hashCode();
  html = html + "< tr>< td>" + k + "< /td>< td>" + v + "< /td>< /tr>";
}
html = html + "< /table>";

Edit: I've noticed that SyntaxHighlighter intermittently messing up with the HTML parts of the source code above. As a quick workaround I broke the HTML tags to avoid breaking the whole thing.

Alright, you got the fish, now here's how to fish. If you have a limited JIRA API knowledge like I do, it's better to start reading with the first two import lines. All you have to do is a Google search, entering the package name followed by "javadoc".

Image courtesy: Google Web Search

Everything seems neatly documented, right? How did I find that FieldLayoutManager package will give me the exact information I need? For that I had to do some keyword searches on the web, go up and down in the API documentation and read some of the package descriptions carefully to choose the correct one.

I (had already) learned that FieldConfiguration has a different meaning internally, and Field Configurations are internally called FieldLayouts. A FieldLayout has FieldLayoutItems, each item describes characteristics of a single JIRA/ custom field within its parent Field Configuration. The information I need here is a list of Field Configurations against aggregated list of each item's field characteristics for comparison. Initially I read through several interfaces under com.atlassian.jira.issue.fields.layout.field package, but with a little common sense I soon realized that FieldLayoutManager interface is going to give me the information I need (it manages the field layouts - so it might give me a list).

The next important line shows how you create a FieldLayoutManager object. See that's not the 'conventional Java way' which we learned at school but using the ComponentAccessor. This is something I learned from observing other developers' work, but the reasoning is out there in the JavaDoc.

Next, we use the getEditableFieldLayouts() method to get the list of all Field Configurations in the JIRA instance. As you can see in this line, you don't have to declare an array and then call the method. That's simplicity of Groovy. Now, the question is, what did it return? What's the value of x? According to the method specification of getEditableFieldLayout(), it's a List of EditableFieldLayout objects. In human readable terms, it's the list of Field Configurations in JIRA. Now we know the list of Field Configurations.

However, they don't come in pretty neat looking strings. They are still Java objects. Each Field Configuration returned is a Java object. We don't know what's inside yet. To see what's inside, I'd take a look at the JavaDoc of the EditableFieldLayout class. It has two methods that I'm interested in, one is getName(), which returns the human readable name of the Field Configuration. The next is, getFieldLayoutItems(), which returns a List of FieldLayoutItem objects. That is the list of fields with characteristics of each.

But now, this list inside list thing is getting deeper by one level, and do we really need to dig that deep? Here's the turning point. My original requirement was to find the duplicates. It doesn't mean that I should follow the same thing I attempted with Oracle. What I actually need is something against each Field Configuration's name that uniquely describes the entire Field Configuration.

This is where hashCode() method in Java comes to play. Every Java Object inherently gets this method. It generates a unique 32-bit hash of the object that is is invoked from. Whenever the object changes, the hash also changes. In this particular case, what we need is to hash the List of FieldLayoutItem objects of each Field Configuration.

With a little bit of HTML formatting to append the Field Configuration - Hash pairs into JIRA Script Console's page, we get a nice table which we can copy-paste into a spreadsheet program and then easily find the duplicate items. Two Field Configurations have the same hash means both Field Configurations are identical.

Example output:
Field ConfigurationHashCode
Default Field Configuration179968652
Copy of Copy of Default Field Configuration179968653
Copy of Default Field Configuration179968653
Copy of FC11290893968
FC1391319565

Just copy-paste the provided source code into your JIRA instance's Script Runner Console and see the results. Create a Field Configuration and execute again. Make a field mandatory in the new Field Configuration and then execute the script again to see that hash also changes. Revert back and the hash also changes to the previous value.

The piece of code I wrote here is not a big deal. I just took some effort to describe it to those who have a little coding knowledge. But see the beauty of results!

Before I wind up, here's a couple of things you'll need to know as a newbie Groovy programmer:
  • Executing .getClass().getName() method on any Java object returns the name of its constructor class. You can then google the classname followed by 'javadoc' to find all the information you need to know about that class, including available methods. This can be helpful when you work with any API you are not familiar with. With log.debug(), you can append this to the application log.
  • I recently read in a funny webcomic that today's computer programming is actually 'Googling the StackOverflow'. Most of the things you need are already out there. What you need is to get the parts together and 'assemble' in the proper manner. Most of the time all you need to have from your own is a clear idea of what you are going to achieve, and the way you are going to achieve it.
  • Although I started explaining the packages imported in the first two lines, the correct way to start writing your own script would be to find out the Java classes that represent the key objects that involve in your mission.
Coding improves your health, isn't it? Think how. Thanks for reading!

Save your day with JIRA AUI JavaScript Hacks

I've been a JIRA administrator for more than four years with the hope that time would permit me to blog anything about JIRA. Finally here it has come to that - my first blog post on JIRA administration!

So what I'm going to talk about today is how AUI JavaScript hacks can save a JIRA administrator's time and make his life easy.

AUI is an abbreviation for Atlassian User Interface Library. AUI JavaScript is actually a modified version of the famous JavaScript framework jQuery. Thus, the most of jQuery's official documentation works with AUI without a hassle.

Now, let me explain a case where AUI hacks can save you from cumbersome work.

Changing the workflow scheme of a JIRA project

It really frustrates me of when it comes to the status mapping part. I hate repetitive work. Especially when your JIRA project has a lot of issue types with a lot of Issues this step is a nightmare.

And this list repeats with all available issue types...
For simplicity, let's just assume all issue types follow the same workflow in the workflow scheme. Imagine your JIRA project has ten issue types and current workflow has ten statuses that do not exist in the new workflow. Then JIRA will give you 10 × 10 = 100 drop down lists to pick the new status mapping for each type-status. And it's a highly error prone when you do this by hand.

So how do we get through it in a 'hacker' way? Learning how to code is a worthy investment. :)

I’m using the Mozilla Firefox web browser with Firebug add-on here because it’s my familiar environment. But you can use vanilla Firefox or Chrome browser with pre-built development tools. First, when you are at the status mapping step, inspect a drop-down list using Firebug.


And then,


When you expand the HTML code for the select list, the HTML elements for the available options become visible. The value for each option is actually the ISSUESTATUS.ID column in JIRA database.

Looking at the structure of the page, jQuery's official documentation, AUI documentation you can quickly come up with a JavaScript code to change each drop down list's selected option to "In Progress" like this:

AJS.$('select option[value="3"]').attr('selected','selected');

The code says, "Make every drop down option who's value is 3 (In Progress) the selected option of its parent select element". Execute it in the Firebug script console and you can see all the drop down lists change their selection at once.


Now that was simple. Imagine you have discussed with the project stakeholders about how existing issue statuses should be mapped and agreed upon a mapping. For this example, let's take only two statuses.

Investigating --> In Progress
Verified --> Closed

Now, you can't use the above one line code because you want to 'filter off' old statuses other than "Investigating" before you change the values to "In Progress". Same applies to the "Verified" old status.

Don't panic. Let's just dig little deeper. If you carefully look at the "name" element of the select element we observed above, it says "mapping_1_10105". We have no idea what these numbers are for now, but with a little more inspection you will see in each drop down list where old status is "Investigating" the select element's name ends with 10105. (yes, it's very likely that status ID of "Investigating" is 10105)

Now, with a little more jQuery knowledge (read more about jQuery selectors), we can modify the above code as follows:

AJS.$('select[name$="_10105"] option[value="3"]').attr('selected','selected');

And for the "Verified" old status we can come up with something like this:

AJS.$('select[name$="_10101"] option[value="6"]').attr('selected','selected');

Just few lines of code and you're through a one cumbersome boring step with a big WOW! :)

Now, here's a question that some of my audience may ask:

What is the benefit of this whole process if you have spend more time on Firebugging and reading jQuery documentation than you could have just updated all entries by hand within a couple of minutes?
  • Because coding is so exciting and everyone should learn how to code. :)
  • Because this approach is less error prone. If your client or stakeholders are paranoid about data integrity, a wrong selection on a production environment can end up in a nightmare for real.
  • If you are doing data migration projects that have to do multiple rounds of testing and UAT, then this approach is a one time investment. You can save your code somewhere and reuse in each testing iteration. This ultimately saves a lot of time.

This blog post would have become unnecessarily long if I were to explain another case. So I won't be discussing more examples here. But AUI JavaScript is a cool thing to play with. Prepare your own evaluation instance of JIRA and you will see many ugly setups can be handled with simple pieces of JavaScript code. So play around, learn and share!

And to finish,... thanks for reading!


(The screenshots and examples used in this blog post do not reflect any of the JIRA setups I worked with at my previous or present places of work. All screenshots and examples are my own work on an evaluation instance of Atlassian JIRA)

Data Migration – From Access 2007 to MySQL

Recently, I was assigned for a project that required one-way synchronization of data, from MS Access to MySQL. This was required to be fully automated to make the task executed once a day. It has already been implemented by someone else before, using PHP as the programming language, and SOAP protocol as the underlying technology. The implementation had several issues, so I was asked to do it in a different approach.

So, roughly, my plan was to dump the Access database into text, and then upload the dump file to the server, and then import to MySQL. So how to do that?

Microsoft Office Access 2007 provides it's own methods to export table content as CSV, and it's really nice that at the MySQL's end the CSV files can be directly read into the MySQL database. Roughly, my approach looked like the following,

Synchronize necessary tables into MySQL
  • Using VBA code, export necessary tables into CSV
  • Compress and upload the CSV files, preferably in a single file
  • At the MySQL's end, import the data upon the upload completes
Make the whole task fully automated
  • Using a MS Access 2007 macro, trigger the VBA code
  • Set up Windows task scheduler
Now, let us explore step-by-step... :-)


Synchronization of Necessary Tables into MySQL

I remember that I was doing good with Microsoft Visual Basic 6.0 six-seven years before. Almost forgotten some, I started working with VBA. Basically it's the TransferText method provided by the DoCmd object in MS Access. In brief, following is the code.

I initially wrote this part of code as a Sub in VB, but later I understood that, to be automated with a macro, I have to make this a Function. (Sub does not return a value but a Function does)

Function ExportData ()
 Dim tables (1 To 3) As String
 Dim table As String
 Dim exportpath As String

 exportpath = "C:\temp\"

 table (1) = "tblStudents"
 table (2) = "tblMarks"
 table (3) = "tblSubjects"

 For Each table In Tables
  DoCmd.TransferText acExportDelim, , table, exportpath + table + ".csv"
 Next table

 ExportData = True ' Return True to indicate (in case if necessary) all done without breaking in the middle
End Function

In my work I had to export several tables. However it's that simple. Now, the next task is to upload the exported CSV to the server, through FTP. As far as I know, VBA does not provide any native/in-built methods to handle FTP. The solution is accessing Windows API. I have programmed with Windows API for classic Visual Basic before so I know how hard it can be without a proper documentation. I have found plenty of nice articles over the Internet on how to do it, but as I do not know how it would be working in later Windows releases such as Vista and Seven and how would Internet security software handle that, I decided to use the PHP command line instead of Visual Basic. By installing the XAMPP package in Windows, you can get PHP CLI work. So, the latter part of the above VBA code goes like this,

Dim cmdline
cmdline = "C:\xampp\php\php.exe c:\uploadcsv.php "
For Each table In Tables
 DoCmd.TransferText ()
 cmdline = cmdline + Chr$ (34) + exportpath + table + ".csv" + Chr$ (34) + " "
Next table

Shell cmdline, vbNormalFocus

As you can see, all the exported file paths are passed to a PHP script called uploadcsv.php. Work to be done with VBA code ends here. Now, the next task is to handle the file upload. PHP provides very easy and nice methods to do that.

First, let us examine the command line, the cmdline variable in our VBA code. It will look like the following. Note that Chr$ (34) returns a double quotation mark (ASCII 34).

C:\xampp\php\php.exe c:\uploadcsv.php "C:\temp\tblStudents.csv" "C:\temp\tblMarks .csv" "C:\temp\tblSubjects.csv"

So, the contents of uploadcsv.php goes here...
I'll explain PHP code wherever necessary, in PHP comments.

<?php
/* 
$argv handles command line input
The first element of the array is the php script filename itself.
So we'll remove it. 
*/
array_shift ($argv);

/* 
We're going to upload several tables in different files.
To upload three files we need three FTP connections.
Archiving makes the three one. And finally we need one FTP connection.
So it reduces the time spent for the work to be done.
For archiving I used the Archive Tar library
which is available at http://pear.php.net/package/Archive_Tar/ 
*/
require_once ("Tar.php");
$tar = "exportcsv.tar";
$tarfile = new Archive_Tar ($tar);
$tarfile->create ($argv);
unset ($tarfile);

/*
Now we can delete the temporary CSV files
*/
foreach ($argv as $file)
{
 unlink ($file);
}

/*
Archiving isn't just enough when file size becomes quite large to upload.
We have several compression methods available
that can drastically reduce the file size.
PHP provides methods to compress data into bzip2 format,
where very high compression ratios are achievable.

When you compress a set of files into one in your computer,
it automatically performs the two steps of archiving and
compressing as a single step.

In my work, archive was 19.xx MB and after compression
it took just 3.xx MB
*/
$finale = $tar . ".bz2";
$bz2 = fopen ($finale, "w");
$bz2data = 

unlink ($tar);

$upload_md5 = md5_file ($finale);
/*
As we are uploading this file,
we need to verify it's integrity at the 
remote end before processing. I used MD5 to
verify the uploaded file's integrity.
Please read http://en.wikipedia.org/wiki/MD5 for more information.
*/

/*
Our data is ready now.
Next is to upload it using FTP
*/
$remote_path = "/home/example/ftp/" . $finale;
/*this is the remote directory where we're going to upload the file.
For security reasons this should be outside of the website's document root (/home/user/public_html) */
$ftp_host = "example.com";
$ftp_user = "example";
$ftp_pass = "p4ssw0r!";

$conn = ftp_connect ($ftp_host,);
ftp_login ($conn, $ftp_user, $ftp_pass);
ftp_pasv ($conn, true);

if (!ftp_put ($conn, $remote_path, $finale, FTP_BINARY))
{
 die ("Upload failed!"); // Abort if upload failed.
}

ftp_close ($conn);

/*
After the upload has finished, we need to tell
the website that the uploaded file is ready to be 
proceed.

We can do this with a HTTP GET but some part of the actual system inspired me to use SOAP.
For simplicity of this article I may use a HTTP request here.

*/

$final_result = file_get_contents ("http://www.example.com/importer.php?file=" . $finale . "&checksum=" . $upload_md5);
/* where www.example.com is the remote location where we keep the script to import data from CSV files */

if ($final_result == "Success!")
{
 echo "One way sync successful!";
}
else
{
 echo "Synchronization failed!\n";
 echo $final_result;
}

Alright. Finally, one more step ahead... data is ready to be imported to MySQL.
It's that importer.php that we called in the earlier script. We need to keep this file inside the document root of the website so it can be called over HTTP.
I'll put the code here, explaining each piece, in the same way as the above.

<?php

require_once ('Tar.php');
 
/*
MySQL Database configuration
*/
$db_server = 'localhost';
$db_user  = 'example';
$db_pass  = 'p4ssw0r!';
$db     = 'example_com';

/*
Directory path (on the remote server) where the uploaded file is kept
*/
$basedir = "/home/example/ftp/";

/*
Connect to the MySQL database
*/
$conn = mysql_connect ($db_server, $db_user, $db_pass);
if (!$conn) { die ("MQSQL database connection failed! Can't continue."); }
mysql_select_db ($db, $conn);


/*
Validate the upl;oaded file against the MD5 checksum
*/
$filename = trim ($_GET['file']);
$checksum = trim ($_GET['checksum']);

$md5 = md5_file ($basedir . $filename);
if ($md5 != $checksum)
{
 die ("File checksum mismatch. Please try again!");
}


/*
Decompress the uploaded file and extract the archive.
Whenever a file becomes no longer necessary,
it is deleted using unlink ()
*/
$arch = $basedir . substr ($filename, 0, -4);
$bz2data = implode ("", file ($basedir . $filename));
$data = bzdecompress ($bz2data, true);
$fp = fopen ($arch, "w");
fwrite ($fp, $data);
fclose ($fp);
unlink ($basedir . $filename);

$tar = new Archive_Tar ($arch);
$tar->extract ($basedir);
unlink ($arch);


/*
Now we have CSV files back, in the server space.
Next task is to find them, and import to MySQL
using a LOAD DATA LOCAL query.

When a particular directory is scanned with scandir () for files,
it returns an array containing the current directory and one level
upper directory as the first two elements. We have to
skip these two before using the return value.
*/
$fl = scandir ($basedir);
array_shift ($fl);
array_shift ($fl); 

/*
A simple loop is used to import each table.
Here each filename (without extension) is equvalant to the
table name in MySQL. That means, the table names are identicle
to the table names in the original Access database.
Otherwise we need to do a small workaround to fix any mismatch.
*/
foreach ($fl as $file)
{
 if ($file != $filename) {
  $src = realpath ($basedir . $file);

  /*
  Strip '.csv' from the filename to get the exact table name
  */
  $tblname = str_replace (".csv", "", $tblname);
  $tblname = strtolower ($tblname);

  /*
  Empty the table before importing
  to prevent duplicate records.
  */
  $q = "TRUNCATE TABLE $tblname";
  mysql_query ($q);
  /*
  This query handles importing CSV to MySQL directly.
  If this functionality was not there with MySQL
  then it would be a certain workaround to import the tables.
  */
  $q = "LOAD DATA LOCAL INFILE '$src' REPLACE INTO TABLE $tblname FIELDS TERMINATED BY ','
  OPTIONALLY ENCLOSED BY '\"' LINES TERMINATED BY '\r\n'";
  $ret = mysql_query ($q);  
  unlink ($src);

  if ($ret != true)
  {
   echo "MySQL query failed!";
  }
 }
}

/*
Everything is complete.
Close the MySQL database connection
*/
mysql_close ($conn);

Finished! Now, additionally we can automate the whole task to make sure the one way synchronization happens time to time.


Making the whole task fully automated

This actually doesn't need anything to do with coding. We need to set up one macro on Access database, and a scheduled task on Windows.

Although I have prepared a clean user manual for our client, I do not wish to do it here in detail here as I am writing this note to technical people. The macro on Access database should go like this,


ActionArgumentsComment
RunCodeExportData ()-
QuitPrompt-

Give the macro a meaningful name. Here I use Sync.

What we're going to do is, periodically open the database file with Microsoft Access, and then automatically execute the macro so it can trigger the function inside the VBA module. But, by default Microsoft Office blocks macros.

We need to prevent Microsoft Access from blocking the macro. Unless we can't automate the task. To do this, create a trusted location and place the database file there.

Finally, we need to set up a scheduled task on Windows, and the program/ command line should go like this,

msaccess.exe "C:\Database.accdb" /ro /nostartup /x Sync


This is my approach. Now, the leftover work is to apply security if necessary, and then sit back, relax, and watch it go! :-)


Security:
  • This implementation is not secure if tables carry sensitive data. Someone can sniff the data in the middle and study the pattern how it works. For additional security we can use SFTP instead of FTP upload. To do this, we can use SSH2 functions for PHP.
  • Also, when calling the 'importer' script we can use SSL encryption. Also it is possible to attach this functionality to the index.php file of the website.

Gotchas:
  • If the target MySQL tables have DATE fields, this will import the dates incorrectly as MySQL expects the date exactly in four digit year-two digit month- two digit date  (ex. "2010-12-25") format.
  • I haven't tested how this would handle primary keys and relationships in the target database. In my case the data in MySQL database was for just displaying only. So it didn't have any keys.

References:

---

This was my approach. If you have a different approach, or any comments, below you have space to write. Comments and expert advice are warmly welcome. :-)

Thanks for reading!


PS:
This wouldn't be a much workaround if there were timestamps in the source tables. But the business client was not willing to change his existing database structure. But, this is what I had and how I solved it. They ask and we got to shut up and do.

Attack and the Defence


Hi dear readers! First of all, I WISH YOU A HAPPY AND PROSPEROUS NEW YEAR WITH LOT OF ACHIEVEMENTS, GLORY AND JOYNESS!! Anyway, 2012 is also approaching.. :D (just kidding)

After a long long time, I've got an interesting problem to solve. I'm not an expert. I'm just writing my own way that I followed in the situation.

This happened during the Christmas days in 2009, and after all, I feel it like a Christmas gift, seriously! :-) I wrote two blog posts in my native language, I you can read, just visit the following links. You'll find it more interesting than this one if you can read. :)
  1. http://blog.shaakunthala.com/2009/12/hacker.html
  2. http://blog.shaakunthala.com/2009/12/bash.html
Alright, then... I'm responsible for the administration of several websites. As I feel, an administrator's job is very much similar to the job of a sea captain. He has to look after the system, like his own... be vigilant of the attacks and other problems,.. and many more work.

Recently, I've been notified that one of my sites is down. An empty page with an error message is displayed when the site is visited, and according to that error message, there's an error on index.php, line 38 and the character < is the cause. This is the way how PHP shows error messages. As my immediate actions, I logged on to the FTP server where our website is hosted and opened the index.php

The website was developed using a CMS. The code looked some kind of strange for me because it had no corresponding ?> tag for its beginning <php tag. An unknown HTML/ Javascript code snippet has appended at the end of the file.

Yes, that's the cause of that error. Somebody has injected a malicious code snippet at the end of the index document, and the PHP engine on the server side has tried to interpret it as PHP. As this has caused a syntax error in PHP, the whole site has gone down as the final result.

Here's the structure of index.php :

<?php
/* PHP
codings of
CMS */

<script> // The foreign Javascript code snippet </script>

What I did is, just copy-pasted the code into a separate text file (for analyzing), and cleaned index.php. Then everything looked normal, but sooner I got to know, actually it is not.

I've never experienced such a situation before. I didn't know where to start, and what to do. But I wanted to find out what the code says. It was some kind of scary and big JavaScript code in a single line. However, it's not so scary!


Okey,... a closer look...


Right... and this is our troublemaker...


Just see carefully,.. you don't need to be a JavaScript guru. :-)


It's not a big deal to identify such big codes. Vigilance is what matters here. They have used the replace () method in JavaScript. See... strategically hiding text by just randomly mixing punctuation, retrieving the original text at run time. Wow!

Finally, it's this:


Looks like it has been created for phishing purposes... but I'm not sure exactly. However, this URL points to an empty page. What I expected was a JavaScript code, but this resulted nothing... I don't know a reason. :-/

Within few hours after fixing the issue, I got to know that our website is down again. The same thing has happened, same style, but the malicious code resulted a different URL. I fixed it again, and started thinking... what on earth could be happened here? :-O

Whoever the attacker has done is injecting some malicious code into the index document, and letting it execute at the client's (browser) end. However, as the code has blindly appended at the end of the file despite the structure of it, I came to a conclusion -- definitely this is done by a bot / script or some other automated mechanism.

So, I did the same operation as before for cure, and then tried to find some solution. Yes, it's gonna be a new experience. To prevent further attacks, I put the following line at the end of the index.php file. It prevented interpreting any code below the line. When I say die!, no further interpretation of code at all. Hence, the site is safe from being down, but the risk is still their till I find where the attack comes from and where the security hole is.

die ();

I tried to find any clue on site logs,.. but no luck. If this attack was carried out through HTTP, site logs (not the CMS logs) should indicate that. What I suspect is, somebody has gained access to the server, and executed a script. By adjusting file permissions on the index document, I found out that the malicious script on the server (or bot) has gained the root access.

Later, I got to know, this has recursed into directory hierarchy through the entire site. And also, I saw that some JavaScript files are also infected. It was shocking! Everything throughout the site can be potentially infected with malicious code and hence unsafe for visitors!! I didn't know how serious the attack was. I have never faced such a situation before, and as the responsible personnel, I have to fix this as soon as possible, with my best efforts.

According to all observations, my conclusion was, this is happened due to the fault of the web hosting provider. I know that CMS' sometimes can contain security holes, but if it was, there should be at least something on the site logs.

All of the above is the summary of my first blog post, mentioned at the top of this post. The next few paragraphs in this post explain how I performed the disinfection.

 ---

The only backup we had was bit old, so I forget the idea of restoring from a bacup archive. The challenge was to find out how serious the attack was, and to disinfect everything.

What I suspect so far:
Every JavaScript file and index document is infected -- but not sure about other text-based file formats.

So I have to check each file for malicious code, and then clean them.

First, I thought of writing a PHP script for the purpose. But, PHP is bit insecure with this work. I know, it's not a big deal to fix the security with PHP, but, I was more interested in bash scripting. As a daily Linux-only computer user, I am very familiar with bash, and feel more reliability with that.

Luckily, the web hosting service provider has offered remote access through ssh. Yes, that's great! I was very keen, the rest's gonna be a party!! ;)


Here's the match highlights... :P

Access through ssh, compress the entire site, and then download it. This is necessary because the safe way is to keep a backup + do a testing when doing something serious. One mistake, could ruin everything!!

Here we go, ssh
$ ssh user@mysite.com

Create an archive, (make it tar.bz2 for higher compression ratio -- easy to download). Then exit ssh.
$ tar cvfj mysite.tar.bz2 mysite/
$ exit

Download the backup, through ssh copy.
$ scp user@mysite.com:/home/user/mysite.tar.bz2 /home/shaakunthala/

Unpack on my computer, to be tested with the script.
$ tar xvjf mysite.tar.bz

Now, next step is to write the script. Fired up my favourite vim editor, and then started thinking. ;) Before writing the script it's necessary to exactly identify the nature of the malicious code. Here's what I've identified:
  • If a file is infected, the malicious code is at the end of the file.
  • The foreign code snippet is different from point to point. But, following text portions can be recognized as a common pattern.
    • GNU GPL
    • window.onload
    • .replace
  • Although it seemed like the infection is only with JavaScript and index documents, I refused to accept that. Also, as we didn't have any gigantic files with our website, I decided the script to test all files throughout the site.
Although it was such an easy task to write a script for malware removal, I had to separate the program into two scripts because find -exec does not recognize functions in bash. So, here's what I wrote:

sitefix.sh
#!/bin/bash
# Author: Sameera Shaakunthala

rm fixlog.txt
rootdir=`pwd`/mysite/
sup=`pwd`"/fixfile.sh"
find $rootdir -exec $sup {} \;
echo "JOB DONE!"

fixfile.sh
#!/bin/bash
# Author: Sameera Shaakunthala

echo "Processing file: "$1
code=`tail --lines=1 $1 | grep "GNU GPL" | grep window.onload | grep .replace`
l=`echo $code | wc -m | awk '{ print $1 }'`

if [ $l -ne 1 ]
then
 lc=`wc -l $1 | awk '{ print $1 }'`
 lc=`expr $lc - 1`
 head $1 -n $lc > tempfile.tmp
 mv tempfile.tmp $1
 echo "File "$1" has been fixed!" | tee -a fixlog.txt
fi

Now, the next task is the test run on my local machine. If this succeeds, it is safe to run the script on the server.

$ chmod +x sitefix.sh fixfile.sh
$ ./sitefix.sh

After execution, I checked the fixlog.txt, which is the output log of the script. OMG! 602 infected files!! :-O I vigorously checked some randomly selected files, they were clean, and as everything seemed to be clean, I uploaded the script to the server, and then executed. :)

$ scp sitefix.sh fixfile.sh user@mysite.com:/home/user
$ ssh user@mysite.com
$ chmod +x sitefix.sh fixfile.sh
$ ./sitefix.sh

Finally, we have set this as a cron job, till we find the actual security hole.

The final result was, the disinfection of the entire website, within few minutes. As I got to know that virus scanners no longer block our website, it was confirmed that the site is clean. Just see the spirit of Linux bash scripting! :)

Hallelujah!

Finally, I put a link to a shocking article that must be read... Just click and see! :(

Finally, captain Shaakunthala saved the day, with the support of other captains and sailors, yeah it's an amazing Christmas gift for a newbie administrator! :D

Invoke Google's Web Search from Bash

Nice ideas come in handy way :) ; invoke Google's web search from your Linux desktop shell! :-O

Here's a small shell script that I wrote couple of minutes ago. Copy-paste it into a new file, save it inside /usr/bin as google. This works in GUI mode with firefox very well, but it doesn't work with lynx. I still could not find any reason,.. may be somebody can come up with an idea.

if [ $# -ne 0 ]
then
  query="http://www.google.lk/#hl=en&q="
  for i in $@
  do
    query=$query$i+
  done
  firefox $query &
else
  echo "Usage: google <your search query>."
fi


Then chmod +x /usr/bin/google as root to make it executable.

Now, enter the following as a command and see: B-)

$ google shaakunthala

Or,

Just press Alt+F2, type google shaakunthala and press Enter.


You can use whatever as your keyword. But, have to follow usual bash (shell) syntax.

For example,
If your query is sameera shaakunthala, your command should be,
$ google sameera shaakunthala

If your query is shaakunthala's portal, your command should be,
$ google shaakunthala\'s portal

If your query is "shaakunthala's portal", your command should be,
$ google "\"shaakunthala\'s portal\""

... and so on.

And use your creativity and combine this with some google search hacks that you know. It can be a powerful web search command from your desktop! :-O

Bye! Ciao! Sweet dreams! :P


*** Update ***

I re-wrote the script for lynx. The problem arises with the hash (#)sign in the URL. So I removed it. The whole thing is more convenient in the command line, than in the GUI mode.

if [ $# -ne 0 ]
then
  query="http://www.google.lk/search?hl=en&q="
  for i in $@
  do
    query=$query$i+
  done
  lynx -accept_all_cookies $query
else
  echo "Usage: google <your search query>."
fi

Here's the code explanation (how it works):
When you execute the script with some arguments, it will concatenate all arguments with plus sign (+) in between. This is necessary to parse the input as web browser URL format. Then it will concatenate it to the Google search URL string to pass it to the server script at Google.

And finally pass the whole thing as an argument to your web browser.

if - then - else - fi : Decision making
$# : Total number of arguements passed to the shell
-ne : not equals
for - do - done : Looping
$@ : all the arguments (except the command itself) passed to the shell

Ciao! :)

MP3 Batch Transcoding with Linux


Well, hello there; after some time... this one is about some small work I've done, that I think usful for other Linux users.

 I'm huge fan of music -- especially hard rock and thrash metal. I feel almost dead if I don't get a chance at least once a day, to listen to them. So I wanted to put my huge collection into my mobile phone's memory chip so I can carry them anywhere I go. But, my poor memory chip is just 1 GB. It's not enough at all! So, the only way to pack as much as I can is, reduce the bitrate of the MP3 files.

The next problem... I don't use Windows, nor Windows based software. But, if occurs a situation where I don't have any chance with Linux, I have installed Windows inside a virtual machine for use. But I rarely use that. Of course I can use JetAudio or any other audio conver to do this easily, but, as a professional and permanent Linux user, that's not my style.

So I asked our smart genie... Google to find out a solution. Here's what I've got:
#!/bin/bash
for file in `ls`
do
file=`echo $file | sed s/\ /_/g`
echo $file
lame --decode $file
lame -b 128 $file.wav
rm $file
rm $file.wav
mv $file.wav.mp3 $file
done

http://www.linuxquestions.org/questions/linux-software-2/reduce-mp3-bitrate-336791/

It's a shell script for batch processing. It will process all the MP3 files inside a given directory. Yes, that's more than what I wanted, but, what would happen if filenames contain whitespaces? The solution is not much practical, because most MP3s we get contains at least one whitespace in filename. I don't have time to rename each and every file. So I wsa thinking about a suitable solution.

It is based on lame encoder, if you don't have it, please install it first.
# apt-get install lame

Yes, the find command! Got that!!! Here's the code I've wrote:
Copy this into a text file (mp3enc.sh).

if [ $# -eq 2 ]
then
mkdir $1/output
cd $1
find . -maxdepth 1 -exec lame -h -b $2 {} ./output/{}  \;
else
echo "Invalid arguements, please refer http://portal.shaakunthala.com/2009/10/mp3-batch-transcoding-with-linux.html"
fi

Then execute,
$ chmod +x mp3enc.sh

Now run it,
$ ./mp3enc.sh <mp3_files_directory> <target_bitrate_kbps>

Eg:
$ ./mp3enc.sh /home/ubuntu/Music/MyMusic 128

It will make a directory called output inside your music directory, and put the encoded files in.

It's simple as that! I think it's easier than JetAudio, isn't it? ;)

Followers

Subscription Options

 Subscribe in a reader

or

Enter your email address:

and
to inscrease

and make me happy. :)

Other Blogs by the Author

The Author

www.flickr.com
ශාකුන්තල | Shaakunthala's items Go to ශාකුන්තල | Shaakunthala's photostream
free counters
TopOfBlogs
Related Posts with Thumbnails