Anything can go here, in any language... except my native language Sinhala. Be cool... anybody is warmly welcomed! :)

Showing posts with label software. Show all posts

[JIRA Administration] How Groovy scripting makes your life easy

In my last blog post I insisted that everyone should learn how to code. If you are a JIRA administrator who would like to do some advanced sort of stuff, keep reading, you'll find out how a little bit of coding can help marvellously. I have a limited OOP background, in fact I've never been a Java programmer, so I find having to deal with this sort of things very exciting.

I wanted to do some cleanup of a huge JIRA instance that has been bit messed up with a LOT of schemes (workflow, issue type, field configuration, etc.). Something I learned from my past experience is, per-project schemes in JIRA is a very bad idea. It affects the manageability of the JIRA instance when it grows. When it comes to duplicate Field Configurations in JIRA, it is extremely difficult to find them by hand.

Normally I would query the database to identify the duplicate schemes in such cases, but when I wanted to see how many duplicate JIRA field configurations exists, Oracle SQL met a likely dead end.

Here's the first SQL query I used:

SELECT
  FL.NAME FIELDCONFIG,
  LISTAGG(FLI.FIELDIDENTIFIER || ISHIDDEN || ISREQUIRED || RENDERERTYPE, ';') WITHIN GROUP (ORDER BY FLI.FIELDIDENTIFIER || ISHIDDEN || ISREQUIRED || RENDERERTYPE)
FROM
  FIELDLAYOUT FL,
  FIELDLAYOUTITEM FLI
WHERE
  FL.ID = FLI.FIELDLAYOUT
GROUP BY FL.NAME;

ORA-01489: result of string concatenation is too long
01489. 00000 - "result of string concatenation is too long"
*Cause: String concatenation result is more than the maximum size.
*Action: Make sure that the result is less than the maximum size.


My plan was to list-aggregate each field's configuration against field configuration's name, and then use SQL "having" clause in a parent query to find out duplicates. This didn't work due to the limitations of Oracle's "listagg" function. Of course a custom "listagg" written in PL/SQL could have helped, but I didn't want to create any additional objects in the database. Also, I wanted to do something that I have never done before. Thus it came to Groovy.

First you need the JIRA Script Runner add-on (in my case it was already there). This add-on provides a Script Console in which you can code Groovy. It doesn't come with a handy IDE, but just a basic code editor. Serves the purpose.

If you execute the following one line piece of code there, you'll see how simple it is. It's based on Java, but lot more simpler to use. If you are scared of OOP like I used to be, here's your chance to practice by swimming in shallow freshwater.

"<h1>Hello World!</h1>";
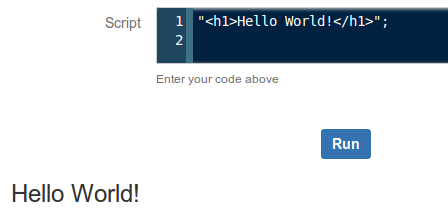
It will do neat HTML!

Here's the piece of code I wrote in Groovy. I'll explain how it serves the purpose as well.

import com.atlassian.jira.component.ComponentAccessor;
import com.atlassian.jira.issue.fields.layout.field.FieldLayoutManager;

log.setLevel(org.apache.log4j.Level.DEBUG);

FieldLayoutManager flm = ComponentAccessor.getComponent (FieldLayoutManager.class);

x = flm.getEditableFieldLayouts();
html = "< table>< tr>< th>Field Configuration< /th>< th>HashCode< /th>< /tr>";
x.each {
 l -> k = l.getName();
  v = l.getFieldLayoutItems().hashCode();
  html = html + "< tr>< td>" + k + "< /td>< td>" + v + "< /td>< /tr>";
}
html = html + "< /table>";

Edit: I've noticed that SyntaxHighlighter intermittently messing up with the HTML parts of the source code above. As a quick workaround I broke the HTML tags to avoid breaking the whole thing.

Alright, you got the fish, now here's how to fish. If you have a limited JIRA API knowledge like I do, it's better to start reading with the first two import lines. All you have to do is a Google search, entering the package name followed by "javadoc".

Image courtesy: Google Web Search

Everything seems neatly documented, right? How did I find that FieldLayoutManager package will give me the exact information I need? For that I had to do some keyword searches on the web, go up and down in the API documentation and read some of the package descriptions carefully to choose the correct one.

I (had already) learned that FieldConfiguration has a different meaning internally, and Field Configurations are internally called FieldLayouts. A FieldLayout has FieldLayoutItems, each item describes characteristics of a single JIRA/ custom field within its parent Field Configuration. The information I need here is a list of Field Configurations against aggregated list of each item's field characteristics for comparison. Initially I read through several interfaces under com.atlassian.jira.issue.fields.layout.field package, but with a little common sense I soon realized that FieldLayoutManager interface is going to give me the information I need (it manages the field layouts - so it might give me a list).

The next important line shows how you create a FieldLayoutManager object. See that's not the 'conventional Java way' which we learned at school but using the ComponentAccessor. This is something I learned from observing other developers' work, but the reasoning is out there in the JavaDoc.

Next, we use the getEditableFieldLayouts() method to get the list of all Field Configurations in the JIRA instance. As you can see in this line, you don't have to declare an array and then call the method. That's simplicity of Groovy. Now, the question is, what did it return? What's the value of x? According to the method specification of getEditableFieldLayout(), it's a List of EditableFieldLayout objects. In human readable terms, it's the list of Field Configurations in JIRA. Now we know the list of Field Configurations.

However, they don't come in pretty neat looking strings. They are still Java objects. Each Field Configuration returned is a Java object. We don't know what's inside yet. To see what's inside, I'd take a look at the JavaDoc of the EditableFieldLayout class. It has two methods that I'm interested in, one is getName(), which returns the human readable name of the Field Configuration. The next is, getFieldLayoutItems(), which returns a List of FieldLayoutItem objects. That is the list of fields with characteristics of each.

But now, this list inside list thing is getting deeper by one level, and do we really need to dig that deep? Here's the turning point. My original requirement was to find the duplicates. It doesn't mean that I should follow the same thing I attempted with Oracle. What I actually need is something against each Field Configuration's name that uniquely describes the entire Field Configuration.

This is where hashCode() method in Java comes to play. Every Java Object inherently gets this method. It generates a unique 32-bit hash of the object that is is invoked from. Whenever the object changes, the hash also changes. In this particular case, what we need is to hash the List of FieldLayoutItem objects of each Field Configuration.

With a little bit of HTML formatting to append the Field Configuration - Hash pairs into JIRA Script Console's page, we get a nice table which we can copy-paste into a spreadsheet program and then easily find the duplicate items. Two Field Configurations have the same hash means both Field Configurations are identical.

Example output:
Field ConfigurationHashCode
Default Field Configuration179968652
Copy of Copy of Default Field Configuration179968653
Copy of Default Field Configuration179968653
Copy of FC11290893968
FC1391319565

Just copy-paste the provided source code into your JIRA instance's Script Runner Console and see the results. Create a Field Configuration and execute again. Make a field mandatory in the new Field Configuration and then execute the script again to see that hash also changes. Revert back and the hash also changes to the previous value.

The piece of code I wrote here is not a big deal. I just took some effort to describe it to those who have a little coding knowledge. But see the beauty of results!

Before I wind up, here's a couple of things you'll need to know as a newbie Groovy programmer:
  • Executing .getClass().getName() method on any Java object returns the name of its constructor class. You can then google the classname followed by 'javadoc' to find all the information you need to know about that class, including available methods. This can be helpful when you work with any API you are not familiar with. With log.debug(), you can append this to the application log.
  • I recently read in a funny webcomic that today's computer programming is actually 'Googling the StackOverflow'. Most of the things you need are already out there. What you need is to get the parts together and 'assemble' in the proper manner. Most of the time all you need to have from your own is a clear idea of what you are going to achieve, and the way you are going to achieve it.
  • Although I started explaining the packages imported in the first two lines, the correct way to start writing your own script would be to find out the Java classes that represent the key objects that involve in your mission.
Coding improves your health, isn't it? Think how. Thanks for reading!

Save your day with JIRA AUI JavaScript Hacks

I've been a JIRA administrator for more than four years with the hope that time would permit me to blog anything about JIRA. Finally here it has come to that - my first blog post on JIRA administration!

So what I'm going to talk about today is how AUI JavaScript hacks can save a JIRA administrator's time and make his life easy.

AUI is an abbreviation for Atlassian User Interface Library. AUI JavaScript is actually a modified version of the famous JavaScript framework jQuery. Thus, the most of jQuery's official documentation works with AUI without a hassle.

Now, let me explain a case where AUI hacks can save you from cumbersome work.

Changing the workflow scheme of a JIRA project

It really frustrates me of when it comes to the status mapping part. I hate repetitive work. Especially when your JIRA project has a lot of issue types with a lot of Issues this step is a nightmare.

And this list repeats with all available issue types...
For simplicity, let's just assume all issue types follow the same workflow in the workflow scheme. Imagine your JIRA project has ten issue types and current workflow has ten statuses that do not exist in the new workflow. Then JIRA will give you 10 × 10 = 100 drop down lists to pick the new status mapping for each type-status. And it's a highly error prone when you do this by hand.

So how do we get through it in a 'hacker' way? Learning how to code is a worthy investment. :)

I’m using the Mozilla Firefox web browser with Firebug add-on here because it’s my familiar environment. But you can use vanilla Firefox or Chrome browser with pre-built development tools. First, when you are at the status mapping step, inspect a drop-down list using Firebug.


And then,


When you expand the HTML code for the select list, the HTML elements for the available options become visible. The value for each option is actually the ISSUESTATUS.ID column in JIRA database.

Looking at the structure of the page, jQuery's official documentation, AUI documentation you can quickly come up with a JavaScript code to change each drop down list's selected option to "In Progress" like this:

AJS.$('select option[value="3"]').attr('selected','selected');

The code says, "Make every drop down option who's value is 3 (In Progress) the selected option of its parent select element". Execute it in the Firebug script console and you can see all the drop down lists change their selection at once.


Now that was simple. Imagine you have discussed with the project stakeholders about how existing issue statuses should be mapped and agreed upon a mapping. For this example, let's take only two statuses.

Investigating --> In Progress
Verified --> Closed

Now, you can't use the above one line code because you want to 'filter off' old statuses other than "Investigating" before you change the values to "In Progress". Same applies to the "Verified" old status.

Don't panic. Let's just dig little deeper. If you carefully look at the "name" element of the select element we observed above, it says "mapping_1_10105". We have no idea what these numbers are for now, but with a little more inspection you will see in each drop down list where old status is "Investigating" the select element's name ends with 10105. (yes, it's very likely that status ID of "Investigating" is 10105)

Now, with a little more jQuery knowledge (read more about jQuery selectors), we can modify the above code as follows:

AJS.$('select[name$="_10105"] option[value="3"]').attr('selected','selected');

And for the "Verified" old status we can come up with something like this:

AJS.$('select[name$="_10101"] option[value="6"]').attr('selected','selected');

Just few lines of code and you're through a one cumbersome boring step with a big WOW! :)

Now, here's a question that some of my audience may ask:

What is the benefit of this whole process if you have spend more time on Firebugging and reading jQuery documentation than you could have just updated all entries by hand within a couple of minutes?
  • Because coding is so exciting and everyone should learn how to code. :)
  • Because this approach is less error prone. If your client or stakeholders are paranoid about data integrity, a wrong selection on a production environment can end up in a nightmare for real.
  • If you are doing data migration projects that have to do multiple rounds of testing and UAT, then this approach is a one time investment. You can save your code somewhere and reuse in each testing iteration. This ultimately saves a lot of time.

This blog post would have become unnecessarily long if I were to explain another case. So I won't be discussing more examples here. But AUI JavaScript is a cool thing to play with. Prepare your own evaluation instance of JIRA and you will see many ugly setups can be handled with simple pieces of JavaScript code. So play around, learn and share!

And to finish,... thanks for reading!


(The screenshots and examples used in this blog post do not reflect any of the JIRA setups I worked with at my previous or present places of work. All screenshots and examples are my own work on an evaluation instance of Atlassian JIRA)

How to Make a HelmetCam Using Your Nokia Smartphone

I have been a silent blogger for more than one year. It's actually one year and one month since I have published my last post on 10 January 2011. Things have changed a lot around me and now I'm not even using the Sony Ericsson phone mentioned in my last post!

Two things happened in the last year... on February I got a new phone as a gift from a friend, and on October I got a bike. That's it! Made in India, and called Hero Honda Hunk. It is said that this bike can topped to 112 km/h. For me that's not enough top speed, but this is one of the most stable bikes made in India. Most others waggle and vibrate, but Hunk is very stable at speed.


Due to the extreme excitement of the bike, I'd just forget to mention the phone! It's a Nokia 5230 and not that handy, but enough for my day-to-day activities. Same as most Nokia cameraphones, this one's camera is also not suitable for professional photography. But, its video recording is pretty good.

I really love to ride this Hunk... (despite of its gay name :-) ) it brings lots of excitement every time when it's over 100. Its stability at higher speeds, and stability when cornering, wheelies, stoppies... everything eventually tempted me to have a video collection of it. This is how I become interested in making a HelmetCam. I don't have much of equipments for this, and I've heard somewhere that a professional HelmetCam kit costs over US $200. So why not use my own cameraphone? Here, I'll explain how to get it prepared with a Symbian (Nokia) phone.

The simple setup is to wear your helmet, and then put the cameraphone in, and fasten it. This setup has a problem. Why? Whenever the touchscreen/ keypad hits your nose or somewhere in your face, there's a probability for video recording to interrupt. Or even it can dial emergency while you are on ride!

This is the time for SymDVR to shine. SymDVR is a very handy app which can turn your cameraphone into a DVR with lots of options. The main reason for using this app is, unlike your phone's in-built video recording application this allows you to lock the screen/ keypad while recording. This is a huge advantage as it also keeps the phone's backlight off while recording.


Other advantages include that it can calculate your riding speed using GPS and include as subtitles, landscape recording while keeping the phone in vertical position, etc.

Go to SymDVR homepage, download and install the app on your Nokia phone. Start the application, choose appropriate settings and start video recording. Once you start recording, you will see a Nokia Menu icon on the screen. Tap on it, and SymDVR will continue to record video, running in the background. Now it can be placed even inside your underwear without interrupting the record. :D

Be sure to have a strap for your phone. You can fasten the helmet's strap across phone's strap to make sure it's safe in case if your phone loosens inside the helmet and falls down on to the road. Other than that, the phone will fall onto the road making you distracted, eventually turning you into dead meat. If you don't have a strap, just go and buy. It won't cost much. This is important to avoid accidental distractions.
Image courtesy: fadbus.com


Now, we need to have is a full face helmet. We are going to need a full face helmet because then only it can be held between your face and the helmet.


If you plan to try this out in Sri Lanka, be sure to choose a helmet with a dark tinted visor. Most of the traffic cops are weird jerks, and if they see the cameraphone inside helmet they will remake the story as you were having a phone call while riding. (They just want you to invite them for a bribe). That's Sri Lankan traffic cops. So beware of them.

Firstly hold your phone vertically, and start recording on SymDVR. Then click on Nokia Menu icon to allow SymDVR to run in background, and lock the screen/ keypad. Even if you hold it vertically, SymDVR will record the video clip in landscape mode without having you to flip the phone, and without affecting the clip size.Then, while wearing the helmet, place the cameraphone in the helmet in the way shown in the photo below. It will fit between your face and the helmet.  Finally, cross the straps as described above.

In this setup, cameraphone fits between my face and helmet.


Make sure that your sight is not disturbed by the position of the camera. Letting it cover one eye and seeing the road by the other is prone for accidents. You need your both eyes to get the correct idea of distance to other vehicles on the road. If you still unsure why, read more about depth perception.

If it doesn't fit into your helmet you will have to find a workaround. A good suggestion that I have seen over the Internet is to use Velcro, but the problem is that you will have glue it onto the phone. :-/

Another suggestion of is to use a phone holder such as Nokia CR-119. You will have to remove the cone shaped part which in normal use attaches to a vehicle windshield. Carefully mount the phone into the holder facing the camera out. This arrangement will take more space inside the helmet, and it will fit better if your head is small. :-)

Make sure that camera is facing directly front. Start your ride, bang all over the city. Forget about the phone and enjoy your ride as much as possible.

A great feature that I really love on SymDVR is that it can measure your speed using GPS. This can be different from the actual speed , plus or minus 2 km/h, but with this feature on you don't have to look at the speedometer to get the speed on video. It also helps a lot to avoid distraction. Speed is recorded in a separate subtitle file (srt), and later you can use a video encoding software to merge it with the video file.

Once you are done, take the phone out, and open up SymDVR. Properly stop recording or otherwise you will end up with a corrupted video file. It will take a moment for the video file to be prepared. Once done, you can connect the phone to PC in Mass Storage Mode, and transfer the video file to your PC. It's in \SymDVR\ directory on your phone's memory card. This is by default hidden if you are using Windows on your PC.

After recording if you want to embed subtitles into the video, I recommend using mencoder. If you just want to trim the video file, you can use ffmpeg to get it done without affecting the video quality.


I have done some helmetcam videos using this setup. And.... here goes my first performing a stoppie somewhere near the end.........


And another I took at Malabe...


Well,... finally that's it! Thanks for reading.
Enjoy!!

K770i Camera Problem [ SOLVED ]

I'm using a Sony Ericsson K770i for more than 1½ years. Since I'm a novice and hobbist photographer my choice was that cameraphone.

Recently, the camera seemed to malfunction. When I open the lens cover, the screen switches between camera viewport and home screen repeatively. Sometimes it looked OK until I capture the scene. This behaviour made things more annoying.

First, I thought this could be a software problem. So I reinstalled the phone's software. But no luck. Then I googled for similar issues and Google took me to this forum discussion. But it also says the same thing.

After examining the camera's unusual behaviour carefully, I realized that there's a low probability of this being a software bug. The problem occurs randomly (not when I do a specific or unusual thing with phone's software). So this should be a hardware problem.

So what could be the problem? Casually I found it.

If you remove the back cover of your K770i phone, you'll see two triangular white tips at the right side of the camera. Now hold the battery with your middle finger and press the upper tip. What you see on screen is the camera viewport. Now try some captures. Will it switch between the home screen and viewport? No.

The problem is actually with the phone's back cover. Hundreds of times I have removed the back cover to change between SIM cards, memory sticks, etc. So it has become loose. It's obvious by looking at this phone, loose back cover means loose lens cover. Nothing wrong with lens cover itself. When you aim the camera, slight movemets of your fingers make the loose cover tighten and loosen, and that tip will press and release repeatively.

So I guess this might be a known issue with K770i. Time spans, back cover loosens.

To temporirily overcome the problem I adjusted the metallic plates in the lens cover. But I advice you not do so yourself and ask for support from a qualified technician.

So this is it. Don't waste time reinstalling any software. Thanks for reading the article.

Data Migration – From Access 2007 to MySQL

Recently, I was assigned for a project that required one-way synchronization of data, from MS Access to MySQL. This was required to be fully automated to make the task executed once a day. It has already been implemented by someone else before, using PHP as the programming language, and SOAP protocol as the underlying technology. The implementation had several issues, so I was asked to do it in a different approach.

So, roughly, my plan was to dump the Access database into text, and then upload the dump file to the server, and then import to MySQL. So how to do that?

Microsoft Office Access 2007 provides it's own methods to export table content as CSV, and it's really nice that at the MySQL's end the CSV files can be directly read into the MySQL database. Roughly, my approach looked like the following,

Synchronize necessary tables into MySQL
  • Using VBA code, export necessary tables into CSV
  • Compress and upload the CSV files, preferably in a single file
  • At the MySQL's end, import the data upon the upload completes
Make the whole task fully automated
  • Using a MS Access 2007 macro, trigger the VBA code
  • Set up Windows task scheduler
Now, let us explore step-by-step... :-)


Synchronization of Necessary Tables into MySQL

I remember that I was doing good with Microsoft Visual Basic 6.0 six-seven years before. Almost forgotten some, I started working with VBA. Basically it's the TransferText method provided by the DoCmd object in MS Access. In brief, following is the code.

I initially wrote this part of code as a Sub in VB, but later I understood that, to be automated with a macro, I have to make this a Function. (Sub does not return a value but a Function does)

Function ExportData ()
 Dim tables (1 To 3) As String
 Dim table As String
 Dim exportpath As String

 exportpath = "C:\temp\"

 table (1) = "tblStudents"
 table (2) = "tblMarks"
 table (3) = "tblSubjects"

 For Each table In Tables
  DoCmd.TransferText acExportDelim, , table, exportpath + table + ".csv"
 Next table

 ExportData = True ' Return True to indicate (in case if necessary) all done without breaking in the middle
End Function

In my work I had to export several tables. However it's that simple. Now, the next task is to upload the exported CSV to the server, through FTP. As far as I know, VBA does not provide any native/in-built methods to handle FTP. The solution is accessing Windows API. I have programmed with Windows API for classic Visual Basic before so I know how hard it can be without a proper documentation. I have found plenty of nice articles over the Internet on how to do it, but as I do not know how it would be working in later Windows releases such as Vista and Seven and how would Internet security software handle that, I decided to use the PHP command line instead of Visual Basic. By installing the XAMPP package in Windows, you can get PHP CLI work. So, the latter part of the above VBA code goes like this,

Dim cmdline
cmdline = "C:\xampp\php\php.exe c:\uploadcsv.php "
For Each table In Tables
 DoCmd.TransferText ()
 cmdline = cmdline + Chr$ (34) + exportpath + table + ".csv" + Chr$ (34) + " "
Next table

Shell cmdline, vbNormalFocus

As you can see, all the exported file paths are passed to a PHP script called uploadcsv.php. Work to be done with VBA code ends here. Now, the next task is to handle the file upload. PHP provides very easy and nice methods to do that.

First, let us examine the command line, the cmdline variable in our VBA code. It will look like the following. Note that Chr$ (34) returns a double quotation mark (ASCII 34).

C:\xampp\php\php.exe c:\uploadcsv.php "C:\temp\tblStudents.csv" "C:\temp\tblMarks .csv" "C:\temp\tblSubjects.csv"

So, the contents of uploadcsv.php goes here...
I'll explain PHP code wherever necessary, in PHP comments.

<?php
/* 
$argv handles command line input
The first element of the array is the php script filename itself.
So we'll remove it. 
*/
array_shift ($argv);

/* 
We're going to upload several tables in different files.
To upload three files we need three FTP connections.
Archiving makes the three one. And finally we need one FTP connection.
So it reduces the time spent for the work to be done.
For archiving I used the Archive Tar library
which is available at http://pear.php.net/package/Archive_Tar/ 
*/
require_once ("Tar.php");
$tar = "exportcsv.tar";
$tarfile = new Archive_Tar ($tar);
$tarfile->create ($argv);
unset ($tarfile);

/*
Now we can delete the temporary CSV files
*/
foreach ($argv as $file)
{
 unlink ($file);
}

/*
Archiving isn't just enough when file size becomes quite large to upload.
We have several compression methods available
that can drastically reduce the file size.
PHP provides methods to compress data into bzip2 format,
where very high compression ratios are achievable.

When you compress a set of files into one in your computer,
it automatically performs the two steps of archiving and
compressing as a single step.

In my work, archive was 19.xx MB and after compression
it took just 3.xx MB
*/
$finale = $tar . ".bz2";
$bz2 = fopen ($finale, "w");
$bz2data = 

unlink ($tar);

$upload_md5 = md5_file ($finale);
/*
As we are uploading this file,
we need to verify it's integrity at the 
remote end before processing. I used MD5 to
verify the uploaded file's integrity.
Please read http://en.wikipedia.org/wiki/MD5 for more information.
*/

/*
Our data is ready now.
Next is to upload it using FTP
*/
$remote_path = "/home/example/ftp/" . $finale;
/*this is the remote directory where we're going to upload the file.
For security reasons this should be outside of the website's document root (/home/user/public_html) */
$ftp_host = "example.com";
$ftp_user = "example";
$ftp_pass = "p4ssw0r!";

$conn = ftp_connect ($ftp_host,);
ftp_login ($conn, $ftp_user, $ftp_pass);
ftp_pasv ($conn, true);

if (!ftp_put ($conn, $remote_path, $finale, FTP_BINARY))
{
 die ("Upload failed!"); // Abort if upload failed.
}

ftp_close ($conn);

/*
After the upload has finished, we need to tell
the website that the uploaded file is ready to be 
proceed.

We can do this with a HTTP GET but some part of the actual system inspired me to use SOAP.
For simplicity of this article I may use a HTTP request here.

*/

$final_result = file_get_contents ("http://www.example.com/importer.php?file=" . $finale . "&checksum=" . $upload_md5);
/* where www.example.com is the remote location where we keep the script to import data from CSV files */

if ($final_result == "Success!")
{
 echo "One way sync successful!";
}
else
{
 echo "Synchronization failed!\n";
 echo $final_result;
}

Alright. Finally, one more step ahead... data is ready to be imported to MySQL.
It's that importer.php that we called in the earlier script. We need to keep this file inside the document root of the website so it can be called over HTTP.
I'll put the code here, explaining each piece, in the same way as the above.

<?php

require_once ('Tar.php');
 
/*
MySQL Database configuration
*/
$db_server = 'localhost';
$db_user  = 'example';
$db_pass  = 'p4ssw0r!';
$db     = 'example_com';

/*
Directory path (on the remote server) where the uploaded file is kept
*/
$basedir = "/home/example/ftp/";

/*
Connect to the MySQL database
*/
$conn = mysql_connect ($db_server, $db_user, $db_pass);
if (!$conn) { die ("MQSQL database connection failed! Can't continue."); }
mysql_select_db ($db, $conn);


/*
Validate the upl;oaded file against the MD5 checksum
*/
$filename = trim ($_GET['file']);
$checksum = trim ($_GET['checksum']);

$md5 = md5_file ($basedir . $filename);
if ($md5 != $checksum)
{
 die ("File checksum mismatch. Please try again!");
}


/*
Decompress the uploaded file and extract the archive.
Whenever a file becomes no longer necessary,
it is deleted using unlink ()
*/
$arch = $basedir . substr ($filename, 0, -4);
$bz2data = implode ("", file ($basedir . $filename));
$data = bzdecompress ($bz2data, true);
$fp = fopen ($arch, "w");
fwrite ($fp, $data);
fclose ($fp);
unlink ($basedir . $filename);

$tar = new Archive_Tar ($arch);
$tar->extract ($basedir);
unlink ($arch);


/*
Now we have CSV files back, in the server space.
Next task is to find them, and import to MySQL
using a LOAD DATA LOCAL query.

When a particular directory is scanned with scandir () for files,
it returns an array containing the current directory and one level
upper directory as the first two elements. We have to
skip these two before using the return value.
*/
$fl = scandir ($basedir);
array_shift ($fl);
array_shift ($fl); 

/*
A simple loop is used to import each table.
Here each filename (without extension) is equvalant to the
table name in MySQL. That means, the table names are identicle
to the table names in the original Access database.
Otherwise we need to do a small workaround to fix any mismatch.
*/
foreach ($fl as $file)
{
 if ($file != $filename) {
  $src = realpath ($basedir . $file);

  /*
  Strip '.csv' from the filename to get the exact table name
  */
  $tblname = str_replace (".csv", "", $tblname);
  $tblname = strtolower ($tblname);

  /*
  Empty the table before importing
  to prevent duplicate records.
  */
  $q = "TRUNCATE TABLE $tblname";
  mysql_query ($q);
  /*
  This query handles importing CSV to MySQL directly.
  If this functionality was not there with MySQL
  then it would be a certain workaround to import the tables.
  */
  $q = "LOAD DATA LOCAL INFILE '$src' REPLACE INTO TABLE $tblname FIELDS TERMINATED BY ','
  OPTIONALLY ENCLOSED BY '\"' LINES TERMINATED BY '\r\n'";
  $ret = mysql_query ($q);  
  unlink ($src);

  if ($ret != true)
  {
   echo "MySQL query failed!";
  }
 }
}

/*
Everything is complete.
Close the MySQL database connection
*/
mysql_close ($conn);

Finished! Now, additionally we can automate the whole task to make sure the one way synchronization happens time to time.


Making the whole task fully automated

This actually doesn't need anything to do with coding. We need to set up one macro on Access database, and a scheduled task on Windows.

Although I have prepared a clean user manual for our client, I do not wish to do it here in detail here as I am writing this note to technical people. The macro on Access database should go like this,


ActionArgumentsComment
RunCodeExportData ()-
QuitPrompt-

Give the macro a meaningful name. Here I use Sync.

What we're going to do is, periodically open the database file with Microsoft Access, and then automatically execute the macro so it can trigger the function inside the VBA module. But, by default Microsoft Office blocks macros.

We need to prevent Microsoft Access from blocking the macro. Unless we can't automate the task. To do this, create a trusted location and place the database file there.

Finally, we need to set up a scheduled task on Windows, and the program/ command line should go like this,

msaccess.exe "C:\Database.accdb" /ro /nostartup /x Sync


This is my approach. Now, the leftover work is to apply security if necessary, and then sit back, relax, and watch it go! :-)


Security:
  • This implementation is not secure if tables carry sensitive data. Someone can sniff the data in the middle and study the pattern how it works. For additional security we can use SFTP instead of FTP upload. To do this, we can use SSH2 functions for PHP.
  • Also, when calling the 'importer' script we can use SSL encryption. Also it is possible to attach this functionality to the index.php file of the website.

Gotchas:
  • If the target MySQL tables have DATE fields, this will import the dates incorrectly as MySQL expects the date exactly in four digit year-two digit month- two digit date  (ex. "2010-12-25") format.
  • I haven't tested how this would handle primary keys and relationships in the target database. In my case the data in MySQL database was for just displaying only. So it didn't have any keys.

References:

---

This was my approach. If you have a different approach, or any comments, below you have space to write. Comments and expert advice are warmly welcome. :-)

Thanks for reading!


PS:
This wouldn't be a much workaround if there were timestamps in the source tables. But the business client was not willing to change his existing database structure. But, this is what I had and how I solved it. They ask and we got to shut up and do.

K770i, Photography and Sorting Problem


Hi fellas, after few days... I'm back again with some cool cool stuff. My internship is over... and now I look for new career opportunities. Anyhow, I was not so quick to apply for a new job like others did. After completing my internship, I wanted a 'free time' of just one or two weeks to have a tour around Sri Lanka.

So, I just had the tour. Amazingly, it was to Jaffna. I live in  Southern Province and going for a tour in Jaffna is just a daydream for a busy man. However, in any tour I have two main intentions, photography and flirting :P . (however I was not able to photograph her since her mom was there :-O )

I have been using a Sony Ericsson K770i phone for more than one year and that phone has made me a photography freak. But recently, it had encountered a problem with it's memory stick reader compartment. This really made me upset as my phone now can't read memory sticks. However, by deleting some wallpapers, ringtones, themes and midlets I managed to make some free space of 15 MB in the phone's internal memory. This is just enough for 15 photos at maximum possible quality. Sad! :(

Luckily I found another phone (a Chinese phone without a brand) which had a memory stick installed and bluetooth also. So my plan was to transfer photos into the Chinese phone over bluetooth after taking each 15 photographs, and delete originals to make free space on my phone for new photos... just like using a revolver ;) . It worked, but since bluetooth file transfer took longer than expected each time I missed few imoprtant shots as well. :(


Sony Cyber-shot cameras use a specific file naming convention. It's the DSC (Digital Still Camera) prefix before the five-digit file number (i.e. DSC00001.JPG, DSC00002.JPG, ...). Due to my 'revolver methodology' sometimes when I make free space my phone seemed to reset the file number. This resulted duplicate filenames, and upon transfer those duplicates were added a Dup(xx) prefix in their filenames. However, thanks to the Chinese phone, during the three days of tour I have been able to take nearly 300 photos, including few panoramas.

After coming home I wanted to arrange all the photos in the correct timeline. Since file naming has already been messed up it was no use arranging them by name. So the next chance is to arrange them by the modification time (unix mtime). Due to some unknown reason, there were some small misconjusnctions in the series when arranging by mtime. It was like Elephant Pass coming before Kilinochchi when heading to Jaffna. :P

So here comes the sorting problem... it's not the Sorting Problem that we learn at the computer science lecture, although we use the tools built upon those theories. I realized that playing with ctime, mtime and atime is just a waste of time... so I was looking for another solution. Yes!, there is. It's the Exif data stored with each file. I can extract the DateTimeOriginal tag from Exif and arrange the file accordingly. I am a Linux geek, so rather than doing a web search for an automated GUI tool  I wanted to do it by myself.

So my ultimate plan was to write a bash script that will check date-time from each file and rename them in the correct order. Also, I wanted them to follow the same DSC convention. There's a handy command line tool for reading image exif on Linux. It's exifprobe. Just an apt-get install is enough to get it installed on the computer. With exifprobe we have another handy tool called exifgrep. Now let us go ahead.

Here we extract the origianal date-time:
$ exifgrep -n DateTimeOriginal DSC00001.JPG

and the output will look like,
JPEG.APP1.Ifd0.Exif.DateTimeOriginal = '2010:09:10 12:04:16'    # DSC00001.JPG:

What I want to do is to list each file against it's OriginalDateTime and then sort with Unix sort command. So it's just one more simple step, (I wanted the output in a text file too)

$ exifgrep -n DateTimeOriginal *.JPG | sort > sorted.txt

Here's a random portion of the output I got,

JPEG.APP1.Ifd0.Exif.DateTimeOriginal = '2010:09:11 12:18:54'    # Dup(01)DSC00046.JPG:
JPEG.APP1.Ifd0.Exif.DateTimeOriginal = '2010:09:11 12:20:39'    # DSC00048.JPG:
JPEG.APP1.Ifd0.Exif.DateTimeOriginal = '2010:09:11 12:23:13'    # Dup(01)DSC00052.JPG:
JPEG.APP1.Ifd0.Exif.DateTimeOriginal = '2010:09:11 13:31:30'    # DSC00001.JPG:
JPEG.APP1.Ifd0.Exif.DateTimeOriginal = '2010:09:11 13:31:49'    # DSC00002.JPG:
JPEG.APP1.Ifd0.Exif.DateTimeOriginal = '2010:09:11 13:32:38'    # DSC00003.JPG:
JPEG.APP1.Ifd0.Exif.DateTimeOriginal = '2010:09:11 13:34:07'    # Dup(01)DSC00004.JPG:
JPEG.APP1.Ifd0.Exif.DateTimeOriginal = '2010:09:11 13:48:40'    # DSC00007.JPG:
JPEG.APP1.Ifd0.Exif.DateTimeOriginal = '2010:09:11 14:01:13'    # Dup(02)DSC00008.JPG:
JPEG.APP1.Ifd0.Exif.DateTimeOriginal = '2010:09:11 14:24:49'    # Dup(01)DSC00014.JPG:
JPEG.APP1.Ifd0.Exif.DateTimeOriginal = '2010:09:11 14:25:43'    # Dup(02)DSC00015.JPG:

Now, it's the time to write the actual shell script. It's not a big deal actually, as you can see, so I don't need to explain.
#!/bin/bash

mkdir sorted
lines=`cat sorted.txt | wc -l`
for (( line=1; line<=$lines; line++ ))
do
  src=`cat sorted.txt | head -$line | tail -1 | awk '{ print $6 }' | cut -d: -f1`
  dest="DSC"`printf "%05d\n" $line`".JPG"
  cp $src sorted/$dest -v
done

Finally, after running this script I managed to get all photographs according to the timeline. I'll be writing a note about my Jaffna tour as soon as possible, and will be releasing some photographs under the Creative Commons Attribution-Share Alike 3.0 Unported license.

Few of them (such as File:JaffnaPeninsula.JPG) are already available on Wikipedia! :-)

See also:
Thanks for reading... have a nice day! :) :) :)

After BSOD -- Windows Se7en

As most of my readers know my day-to-day desktop OS is Ubuntu (Linux). However I still use Windows (on VirtualBox) in certain cases, usually software testing. These days I'm involved in some work that involve 'eavesdropping' on COM port for nothing but පිටිපස්සේ අමාරුව. :P

When I switch from seamless mode to windowed mode, the machine held itself. On the top there was a greenish stripe with some random dots, and mouse pointer animation has stopped. However I could move the mouse over -- of course I should be able to do that since it supports mouse pointer integration.

I waited about 5 mins for the VM to respond; and there was no response and I rebooted. After reboot I got to know that it was a BSOD :P . I never knew before -- so no screenshot.


So that's how BSOD in Windows Se7en on VirtualBox! (It's not really blue :P )

Attack and the Defence


Hi dear readers! First of all, I WISH YOU A HAPPY AND PROSPEROUS NEW YEAR WITH LOT OF ACHIEVEMENTS, GLORY AND JOYNESS!! Anyway, 2012 is also approaching.. :D (just kidding)

After a long long time, I've got an interesting problem to solve. I'm not an expert. I'm just writing my own way that I followed in the situation.

This happened during the Christmas days in 2009, and after all, I feel it like a Christmas gift, seriously! :-) I wrote two blog posts in my native language, I you can read, just visit the following links. You'll find it more interesting than this one if you can read. :)
  1. http://blog.shaakunthala.com/2009/12/hacker.html
  2. http://blog.shaakunthala.com/2009/12/bash.html
Alright, then... I'm responsible for the administration of several websites. As I feel, an administrator's job is very much similar to the job of a sea captain. He has to look after the system, like his own... be vigilant of the attacks and other problems,.. and many more work.

Recently, I've been notified that one of my sites is down. An empty page with an error message is displayed when the site is visited, and according to that error message, there's an error on index.php, line 38 and the character < is the cause. This is the way how PHP shows error messages. As my immediate actions, I logged on to the FTP server where our website is hosted and opened the index.php

The website was developed using a CMS. The code looked some kind of strange for me because it had no corresponding ?> tag for its beginning <php tag. An unknown HTML/ Javascript code snippet has appended at the end of the file.

Yes, that's the cause of that error. Somebody has injected a malicious code snippet at the end of the index document, and the PHP engine on the server side has tried to interpret it as PHP. As this has caused a syntax error in PHP, the whole site has gone down as the final result.

Here's the structure of index.php :

<?php
/* PHP
codings of
CMS */

<script> // The foreign Javascript code snippet </script>

What I did is, just copy-pasted the code into a separate text file (for analyzing), and cleaned index.php. Then everything looked normal, but sooner I got to know, actually it is not.

I've never experienced such a situation before. I didn't know where to start, and what to do. But I wanted to find out what the code says. It was some kind of scary and big JavaScript code in a single line. However, it's not so scary!


Okey,... a closer look...


Right... and this is our troublemaker...


Just see carefully,.. you don't need to be a JavaScript guru. :-)


It's not a big deal to identify such big codes. Vigilance is what matters here. They have used the replace () method in JavaScript. See... strategically hiding text by just randomly mixing punctuation, retrieving the original text at run time. Wow!

Finally, it's this:


Looks like it has been created for phishing purposes... but I'm not sure exactly. However, this URL points to an empty page. What I expected was a JavaScript code, but this resulted nothing... I don't know a reason. :-/

Within few hours after fixing the issue, I got to know that our website is down again. The same thing has happened, same style, but the malicious code resulted a different URL. I fixed it again, and started thinking... what on earth could be happened here? :-O

Whoever the attacker has done is injecting some malicious code into the index document, and letting it execute at the client's (browser) end. However, as the code has blindly appended at the end of the file despite the structure of it, I came to a conclusion -- definitely this is done by a bot / script or some other automated mechanism.

So, I did the same operation as before for cure, and then tried to find some solution. Yes, it's gonna be a new experience. To prevent further attacks, I put the following line at the end of the index.php file. It prevented interpreting any code below the line. When I say die!, no further interpretation of code at all. Hence, the site is safe from being down, but the risk is still their till I find where the attack comes from and where the security hole is.

die ();

I tried to find any clue on site logs,.. but no luck. If this attack was carried out through HTTP, site logs (not the CMS logs) should indicate that. What I suspect is, somebody has gained access to the server, and executed a script. By adjusting file permissions on the index document, I found out that the malicious script on the server (or bot) has gained the root access.

Later, I got to know, this has recursed into directory hierarchy through the entire site. And also, I saw that some JavaScript files are also infected. It was shocking! Everything throughout the site can be potentially infected with malicious code and hence unsafe for visitors!! I didn't know how serious the attack was. I have never faced such a situation before, and as the responsible personnel, I have to fix this as soon as possible, with my best efforts.

According to all observations, my conclusion was, this is happened due to the fault of the web hosting provider. I know that CMS' sometimes can contain security holes, but if it was, there should be at least something on the site logs.

All of the above is the summary of my first blog post, mentioned at the top of this post. The next few paragraphs in this post explain how I performed the disinfection.

 ---

The only backup we had was bit old, so I forget the idea of restoring from a bacup archive. The challenge was to find out how serious the attack was, and to disinfect everything.

What I suspect so far:
Every JavaScript file and index document is infected -- but not sure about other text-based file formats.

So I have to check each file for malicious code, and then clean them.

First, I thought of writing a PHP script for the purpose. But, PHP is bit insecure with this work. I know, it's not a big deal to fix the security with PHP, but, I was more interested in bash scripting. As a daily Linux-only computer user, I am very familiar with bash, and feel more reliability with that.

Luckily, the web hosting service provider has offered remote access through ssh. Yes, that's great! I was very keen, the rest's gonna be a party!! ;)


Here's the match highlights... :P

Access through ssh, compress the entire site, and then download it. This is necessary because the safe way is to keep a backup + do a testing when doing something serious. One mistake, could ruin everything!!

Here we go, ssh
$ ssh user@mysite.com

Create an archive, (make it tar.bz2 for higher compression ratio -- easy to download). Then exit ssh.
$ tar cvfj mysite.tar.bz2 mysite/
$ exit

Download the backup, through ssh copy.
$ scp user@mysite.com:/home/user/mysite.tar.bz2 /home/shaakunthala/

Unpack on my computer, to be tested with the script.
$ tar xvjf mysite.tar.bz

Now, next step is to write the script. Fired up my favourite vim editor, and then started thinking. ;) Before writing the script it's necessary to exactly identify the nature of the malicious code. Here's what I've identified:
  • If a file is infected, the malicious code is at the end of the file.
  • The foreign code snippet is different from point to point. But, following text portions can be recognized as a common pattern.
    • GNU GPL
    • window.onload
    • .replace
  • Although it seemed like the infection is only with JavaScript and index documents, I refused to accept that. Also, as we didn't have any gigantic files with our website, I decided the script to test all files throughout the site.
Although it was such an easy task to write a script for malware removal, I had to separate the program into two scripts because find -exec does not recognize functions in bash. So, here's what I wrote:

sitefix.sh
#!/bin/bash
# Author: Sameera Shaakunthala

rm fixlog.txt
rootdir=`pwd`/mysite/
sup=`pwd`"/fixfile.sh"
find $rootdir -exec $sup {} \;
echo "JOB DONE!"

fixfile.sh
#!/bin/bash
# Author: Sameera Shaakunthala

echo "Processing file: "$1
code=`tail --lines=1 $1 | grep "GNU GPL" | grep window.onload | grep .replace`
l=`echo $code | wc -m | awk '{ print $1 }'`

if [ $l -ne 1 ]
then
 lc=`wc -l $1 | awk '{ print $1 }'`
 lc=`expr $lc - 1`
 head $1 -n $lc > tempfile.tmp
 mv tempfile.tmp $1
 echo "File "$1" has been fixed!" | tee -a fixlog.txt
fi

Now, the next task is the test run on my local machine. If this succeeds, it is safe to run the script on the server.

$ chmod +x sitefix.sh fixfile.sh
$ ./sitefix.sh

After execution, I checked the fixlog.txt, which is the output log of the script. OMG! 602 infected files!! :-O I vigorously checked some randomly selected files, they were clean, and as everything seemed to be clean, I uploaded the script to the server, and then executed. :)

$ scp sitefix.sh fixfile.sh user@mysite.com:/home/user
$ ssh user@mysite.com
$ chmod +x sitefix.sh fixfile.sh
$ ./sitefix.sh

Finally, we have set this as a cron job, till we find the actual security hole.

The final result was, the disinfection of the entire website, within few minutes. As I got to know that virus scanners no longer block our website, it was confirmed that the site is clean. Just see the spirit of Linux bash scripting! :)

Hallelujah!

Finally, I put a link to a shocking article that must be read... Just click and see! :(

Finally, captain Shaakunthala saved the day, with the support of other captains and sailors, yeah it's an amazing Christmas gift for a newbie administrator! :D

How I switched to Linux


Hi all, after about a one month of silence, I've thought of a nice story to share with you readers. How I switched to Linux.... well, I feel it interesting.... don't know how you'll feel. Just read... you don't need to be a geek. :-)

I live in Ambalangoda, 86 kilometers away from the capital of Sri Lanka and at that time the Internet and computers were not so popular in our area. Even I got my own personal computer in 2003. (I'm still talking about the situation before 2003) The main source of information were just newspapers, magazines, and library books. Because of my usual habit of reading everything I have, I got to know that there is something called Linux, some call it RedHat, and it is different from our Windows, we have to use it from the command line, no mouse,.. and blah blah..

However, after I got my own computer in 2003 (which had Windows installed by default -- obviously), I wanted to try out Linux. But, I couldn't find any installation media. And also, at that time I was living inside a 'Matrix' made by Windows, and I eventually forgot Linux.

In 2005, while I was studying for my A Level examination, one of my friends, who was spending his first year as an undergraduate at SLIIT, opened the door of open source to me. And that was Ubuntu! He was one of my closest friends, and we usually discuss technology related stuff and share our knowledge whenever we meet. He said that they study C programming language in their first semester, and the course is based on Linux.

Furthermore, as he introduced it to me, Ubuntu is a type of Linux, and it looks the same as Windows, you can install aside Windows, you can use the mouse, grapical user interface, you have nice themes, but can't play videos and music, and can't install any software that works with Windows.

So, it made me an Alice in the Wonderland, and I was very keen to learn more. I asked, "Don't we need to type a single command?" (that's what I've heard before). Then he showed me, "Here it is..." the terminal. For me it was amazing,... totally new and there's a whole World in front of me to explore, but, for most of the same aged individuals, it is not.

"Can I borrow your copy for two days?"

"Hey, it's yours!"

He gave me another copy containing two CDs of Ubuntu 5.10, with their logo originally printed on it. One Live CD - One Installation CD. Wow! it was free!!

Canonical, the maintainer of Ubuntu, was shipping large quantities of installation at that time. My friend has ordered 20 copies for re-distribution. But I'm pretty sure that nobody other than both of us were using it till today.


I installed it on my computer and started using it as my secondary OS, but I still didn't have an Internet connection at home. So, learning was very hard. Several times Windows installer ruined the bootloader and I was helpless. But interestingly, my courage and effort was still there! I still wanted to explore this new world!!

I wanted to join Ubuntu community, but no Internet. Download software for Ubuntu, no Internet. But, although I've felt Ubuntu can do nothing other than consuming three valuable gigabytes of my 20 GB hard drive, the remarkable thing was, I still wanted to use and redistribute!! But again,.. no Internet to make the shipit order. :(

Finally, in 2006, I was lucky to have a dial-up Internet connection at home. I've joined the Ubuntu community, asked lot of questions, answered one or two, and I began learning fast. Still I didn't know what Linux is, haven't even heard the word "kernel", but I was happy with what I have. I also distributed some installation media, about 50 copies were given to various people, but, today, only less that ten of those are still using it.

I was doing Win-Lin dual boot for some time. By reading various stuff, I got to know that there are many distributions. I've used Kubuntu, Edubuntu, Mandriva, Puppy, Knoppix and PCLinuxOS 2007. But none of them were able to suit me like Ubuntu did. I know, it's psychology,... the first impression with the meaning of the word "Ubuntu" -- humanity; it simply didn't let me run away.

In 2007, I entered University of Colombo School of Computing as and internal undergraduate, and UCSC is an excellent playground for wannabe Linux geeks. I was studying, studying and studying,... I got to know about the software market, copyrights, law, the FOSS concept, RMS' four freedoms, software licensing, community, what Linux is, it's evolution, the kenel, and all that. So, finally I decided to completely switch to the open source software, rather than sticking into closed Windows.

"Once I get to know about what the Linux is, I will switch"

So, roughly seven months ago, I have been able to do it! (most of my colleagues have not) I removed all Windows stuff from my hard drive, re-partitioned it, and installed two distros. One is Ubuntu, and the other is Fedora. Ubuntu is for day-to-day usage and Fedora is for learning purposes. As I had a sound understanding of what Linux is, and how it worked, it was very easy for me to adopt to the new environment.

I'm still an undergraduate at UCSC, and spending my final year. I have gained lots of things thought my experience, and thought my studies. I use Linux at my school desk, I use it at home, I use it on the way to home, I listen to rock, watch TV, do my assignments and projects, collaborate with my friends, continuously learn, blog and have fun,... one system - for everything. Thanks to Linus and RMS!! :-)

Finally, today I feel I am one of the happy Linux users of this World but I know still we have very few happy Linux users in the World. And I am proud to be part of that beneficent community.

Thanks for reading!

Ubuntu 9.10, Karmic Koala


Howdy..! At last, I was lucky enough to receive my copy of the latest Ubuntu 9.10 Karmic Koala, from Canonical. I was silent over past few days because severe lightning ruined my laptop's power adapter. :( My laptop runs without a battery, and it's only power source is the AC adapter. However, I managed to make it work somehow, and at this time, things are bit OK.

Mmm... Ubuntu..! It looks like that Canonical has bit changed their usual way of shipping policies. In earlier releases, they shipped big amounts of installation media. Later, they limited. But now, if you has received the earlier version (9.04) via shipit service, they won't ship the latest version. They would deny the request, and ask you to update the existing version instead. :(


At glance, the new Ubuntu is OK and friendlier than previous version. Here, I discuss few things I have specially noticed. Some of them are really good, but few things are not.

GRUB2 (Beta)
The bootloader used in earlier versions of Ubuntu is GRUB. But now it has been replaced by GRUB2 which is still in beta. GRUB2 provides more sophisticated graphical interface than GRUB Legacy. When booting, stage 1.5 is no longer used. Also, GRUB configuration is stored in a file named grub.cfg, rather than menu.lst. Configuration file syntax has become changed, and more advanced  than legacy.

But, a one serious draw back with GRUB2 that I have noticed is, it no longer supports bootloader password. In my point of view, this is a huge disadvantage since any idiot can adjust kernel parameters in order to gain root access very easily. So what I did is, soon after installing Ubuntu, switched back to GRUB Legacy. If you wish to do that, use the following command:

$ sudo apt-get install grub
$ sudo grub

Then overwrite the bootloader as specified in this article. Follow the same procedure for your hard drive.

GRUB Legacy works with Ubuntu 9.10 very well, no issues at all. :-)

In distros like Debian, the user is asked to chose the bootloader (whether GRUB, LILO or GRUB2) during installation. But Ubuntu does not. It asks only for the location where bootloader should install. But according to my views, when distributing beta software as a default package for some appliance, the older (stable) version should be kept aside as an option to let the user decide what to install. Because beta software might sometimes dissatisfy the user.

Encrypted Home Folder
This is actually an option provided by ubiquity, the Ubuntu installer. When you set up your user account during installation, you can either choose to require password to login, or require password to login and decrypt home folder, or automatically login. But, the second option seems like a troublemaker since it makes problems with login if you change your password later.

Just see for yourself. ;-)

New Appearance
New dark splash and login screens feel better than earlier ones, Boot time also seems reduced than 9.04. Console font has also become more readable and because of that, console screen has made more roomy.

Default human theme has also modified to become more darker than the earlier... ;-) However, personally I would prefer the earlier one than that.

Like in 9.04, in this release also Ctrl+Alt+Backspace key sequence is disabled. This is not so good since if your desktop freezes, you might need to restart your computer. If this key sequence has been enabled, you can just restart the current X session (without having to reboot) in a such situation. If you want to re-enable it, just go to System --> Preferences --> Keyboard, and then follow the screenshot below.


Click to zoom

However, in Linux, freezing is not an often thing. :-)

New Wallpapers Collection
New wallpapers collection is really a thing to mention because rather than greenish one or two wallpapers that earlier releases had, the new aesthetically pleasing wallpaper set attracts the user... like Windows Vista did. :P

Audio Volume Increasable up to 150%
The worst problem I ever had with Ubuntu audio is, it does not produce enough sound. I was looking for a solution browsing through various forums and blogs, but had no luck. Finally I decided to use SMPlayer since it provides capability to increase audio volume up to more than 100%.

But now, in new Ubuntu 9.10, it provides a very convenient graphical way to increase audio volume up to 150%. For me this is really a great thing since I'm a huge fan of music. However, if you increase volume level than 100%, changes are not persistent. At next reboot, it will again drop to 100%. :(


Click to zoom

Also, Karmic Koala provides a more comprehensible interface for audio configuration. But older configuration interface is also still available through the command line. Just run alsamixer on command line and see.

iBus Input Method Framework
Since I use two languages, it is often needed to switch between those input methods. So, an input method provider is a must. Earlier it was SCIM, and now it has been replaced by iBus which provides a more user friendly configuration interface, and smoother operation. I really like the new iBus. :-)


UbuntuOne
UbuntuOne is an online file hosting service based on cloud computing technology. It is offered by Canonical and they provide 2 GB of space for free of charge, and it cloud can be upgraded to 50 GB for $10 per month. The service is still in public beta.

More information is available here.

Firefox 3.5 as Web Browser
Although Firefox 3.5 was released before Ubuntu 9.04 Jaunty, they distributed the older version. But, in Ubuntu 9.10 the web browser is Firefox 3.5.3.

Empathy as the Default IM Client
A significant change is that they have replaced the default IM client by Empathy. Earlier it was Pidgin. Unlike Pidgin, Empathy supports audio and visual communication.

Screensavers
The number of screensavers has been reduced, and my favourite screensaver Skyrocket is also missing. :-(

In the screensavers dialog box, screen saver preview area had some issues with compiz fusion, but now that seems fixed.


Overall, I feel that Ubuntu has become more and more like Windows than ever it was. And it no longer looks like a g33k's operating system. In my laptop, Karmic Koala works really faster than Jaunty Jackalope. And also compiz fusion works with no issues. However, most users like it. :-)

So, why waiting? Get it..!

(Till I get my laptop fixed, ciao......!!!)

Invoke Google's Web Search from Bash

Nice ideas come in handy way :) ; invoke Google's web search from your Linux desktop shell! :-O

Here's a small shell script that I wrote couple of minutes ago. Copy-paste it into a new file, save it inside /usr/bin as google. This works in GUI mode with firefox very well, but it doesn't work with lynx. I still could not find any reason,.. may be somebody can come up with an idea.

if [ $# -ne 0 ]
then
  query="http://www.google.lk/#hl=en&q="
  for i in $@
  do
    query=$query$i+
  done
  firefox $query &
else
  echo "Usage: google <your search query>."
fi


Then chmod +x /usr/bin/google as root to make it executable.

Now, enter the following as a command and see: B-)

$ google shaakunthala

Or,

Just press Alt+F2, type google shaakunthala and press Enter.


You can use whatever as your keyword. But, have to follow usual bash (shell) syntax.

For example,
If your query is sameera shaakunthala, your command should be,
$ google sameera shaakunthala

If your query is shaakunthala's portal, your command should be,
$ google shaakunthala\'s portal

If your query is "shaakunthala's portal", your command should be,
$ google "\"shaakunthala\'s portal\""

... and so on.

And use your creativity and combine this with some google search hacks that you know. It can be a powerful web search command from your desktop! :-O

Bye! Ciao! Sweet dreams! :P


*** Update ***

I re-wrote the script for lynx. The problem arises with the hash (#)sign in the URL. So I removed it. The whole thing is more convenient in the command line, than in the GUI mode.

if [ $# -ne 0 ]
then
  query="http://www.google.lk/search?hl=en&q="
  for i in $@
  do
    query=$query$i+
  done
  lynx -accept_all_cookies $query
else
  echo "Usage: google <your search query>."
fi

Here's the code explanation (how it works):
When you execute the script with some arguments, it will concatenate all arguments with plus sign (+) in between. This is necessary to parse the input as web browser URL format. Then it will concatenate it to the Google search URL string to pass it to the server script at Google.

And finally pass the whole thing as an argument to your web browser.

if - then - else - fi : Decision making
$# : Total number of arguements passed to the shell
-ne : not equals
for - do - done : Looping
$@ : all the arguments (except the command itself) passed to the shell

Ciao! :)

How I Prepared My GRUB-Bootable USB Flash Drive


Again... the GNU GRUB. I really can't forget such an interesting software that I can study. Today, I'm going to put the English version of my another Sinhala blog post. It's about how I made my flash drive a bootable one.

Now you might say,.. "That's pretty easy stuff with Windows... Just right click and Format...."; wait.........! I'm not going to talk about the DOS/ Windows bootloader. DOS/ Windows bootloader is nothing compared to the GNU GRUB. What I'm going to put here is how to put the GRUB + kernel into your flash drive.

First, I would like to give a small introduction on the GNU GRUB. Wikipedia got a whole lot of information,.. but I'll also explain. Simply, GRUB is a bootloader. A bootloader is the program loads the operating system when your computer boots. Have you ever seen the "NTLDR is missing" error on a Windows XP installed system? Yes, that NTLDR is the bootloader of Windows NT based operating systems. There are two most used types of bootloaders with Linux. One is LILO (LInux LOader) and the other is GRUB (GRand Unified Bootloader). Due to numerous reasons the most popular bootloader among the two is the GRUB. I'm not going to list them here,.. but believe me.. the GRUB is really a 'thing' to study!

So,.. we are bit off the topic.Let's get back on it. How would it be if I install the GRUB on a USB flash drive? That's what came into my mind when I was reading the posts on UCSC LMS (I'm a student). Yes, it would be great! There are several advantages I can think of.
  • If I boot a Live CD, it takes some time. But, here as it is a bootloader only system, it takes a less time to boot up.
  • I can study further,.. (I'm not a Linux expert)
  • I can hijack Linux systems,... :D
  • I can check the RAM using memtest+86.bin kernel

I have a 4 GB flash drive. So here's how I did with it:

1. Backed up all the data on the flash drive as I'm gonna partition it.

2. Divided the drive into two primary partitions. It doesn't matter whether it is primary or logical, but as I didn't need any more partitions, I set it as this.

# fdisk /dev/sdb

One partition is a FAT-32 one to keep my personal files,which I might need to use with both Windows and Linux. It should be the first partition on the flash drive. Unless, Windows will spoil up everything. I left 50 MB at the end of the partition table as unpartitioned/ free space which I'm going to use for the boot partition.

As I've mentioned earlier, Windows can not identify the partitions other than the physically first partition on the flash drive partition table. That means, even if the partition number is not 1, it should exist first to be identified by Windows.

The second one, is nearly 50 MB, and is ext-2 type. It holds the GRUB's files and the kernel.

Formatted the partitions using the following commands:
# mkdosfs /dev/sdb1 -v -F 32 -n LEONIDAS_4G
# mke2fs /dev/sdb2 -L boot

Now mounted them,
# mkdir /media/data; mount -t vfat /dev/sdb1 /media/data

# mkdir /media/boot; mount /dev/sdb2 /media/boot

3. Well, there could be a systematic way to do this. But, I'm not a Linux expert. So, please don't laugh at me. This is how I did it:

# cd /
# cp -rfv boot /media/boot

Now, the GRUB installation, the thing I recently got to know from our LMS forum.

# grub
grub> find /media/boot/boot/grub/stage1

Now it gives the following output:
(hd1,1)

According to the notation, the second partition on the flash drive is (hd1,1). The next step is;

grub> root (hd1,1)
grub> setup (hd1)
grub> quit

Now, the GRUB has been installed on the flash drive.

4. Now I carefully examined the boot partition on the flash drive. There were two versions of the kernal and related files. This might be probably due to a kernal update on my system. It doesn't matter. I kept the most recent version and deleted the other.

5. Finally I edited the menu.lst, which caontains the initial configuration of the GRUB, when it boots. Here's the entire menu.lst file:

title    Linux kernel 2.6.27-14-generic
root     (hd0,1)
kernel   /boot/vmlinuz-2.6.27-14-generic root=UUID=d1670f8e-eb3f-4dba-bba5-e00f0437e2a2 ro single
initrd   /boot/initrd.img-2.6.27-14-generic

title    memtest86+
root     (hd0,1)
kernel   /boot/memtest86+.bin


There's another few important things to state here. Althoug the flash drive is (hd1) here, it becomes (hd0) when booting. The reason is almost obvious, when you set it as the first boot device on the BIOS, it becomes the first device.

The next thing is the UUID. UUID is sent to the kernel as a parameter. You can find the UUID using this:

# vol_id --uuid /dev/sdb2

6. Okey,.. I'm almost done. The final step is to boot. The GRUB loading can bee seen and then the boot menu. You can either edit the menu and boot the kernel on the hard disk or boot the kernel on the flash drive.

There is no init on the flash drive because I didn't put it on the drive. So when booting, it show an error message, and drops into a BusyBox shell. It works on the RAM (initramfs). In simple terms, there is a shell = we can make use of the kernel. :)

7. Restore the backup (personal data/ files) onto the FAT 32 partition on the flash drive. If you plug the flash drive inta a Windows machine, the whole thing may look like this:


Do not delete any of the partitions using the Windows Disk Management Console. If you want to format your data drive, you can go through My Computer and format. Do not touch the other one as it could ruin the entire filesystem on the flash drive which we have built so far. Also if you want to adjust the partition table, the safe option is to do it with Linux.

Finally, I have to say is I've experimented and learnt something new. And I wanted to share my experience here!

Thanks for reading.

Followers

Subscription Options

 Subscribe in a reader

or

Enter your email address:

and
to inscrease

and make me happy. :)

Other Blogs by the Author

The Author

www.flickr.com
ශාකුන්තල | Shaakunthala's items Go to ශාකුන්තල | Shaakunthala's photostream
free counters
TopOfBlogs
Related Posts with Thumbnails