Anything can go here, in any language... except my native language Sinhala. Be cool... anybody is warmly welcomed! :)

Showing posts with label fun. Show all posts

[JIRA Administration] How Groovy scripting makes your life easy

In my last blog post I insisted that everyone should learn how to code. If you are a JIRA administrator who would like to do some advanced sort of stuff, keep reading, you'll find out how a little bit of coding can help marvellously. I have a limited OOP background, in fact I've never been a Java programmer, so I find having to deal with this sort of things very exciting.

I wanted to do some cleanup of a huge JIRA instance that has been bit messed up with a LOT of schemes (workflow, issue type, field configuration, etc.). Something I learned from my past experience is, per-project schemes in JIRA is a very bad idea. It affects the manageability of the JIRA instance when it grows. When it comes to duplicate Field Configurations in JIRA, it is extremely difficult to find them by hand.

Normally I would query the database to identify the duplicate schemes in such cases, but when I wanted to see how many duplicate JIRA field configurations exists, Oracle SQL met a likely dead end.

Here's the first SQL query I used:

SELECT
  FL.NAME FIELDCONFIG,
  LISTAGG(FLI.FIELDIDENTIFIER || ISHIDDEN || ISREQUIRED || RENDERERTYPE, ';') WITHIN GROUP (ORDER BY FLI.FIELDIDENTIFIER || ISHIDDEN || ISREQUIRED || RENDERERTYPE)
FROM
  FIELDLAYOUT FL,
  FIELDLAYOUTITEM FLI
WHERE
  FL.ID = FLI.FIELDLAYOUT
GROUP BY FL.NAME;

ORA-01489: result of string concatenation is too long
01489. 00000 - "result of string concatenation is too long"
*Cause: String concatenation result is more than the maximum size.
*Action: Make sure that the result is less than the maximum size.


My plan was to list-aggregate each field's configuration against field configuration's name, and then use SQL "having" clause in a parent query to find out duplicates. This didn't work due to the limitations of Oracle's "listagg" function. Of course a custom "listagg" written in PL/SQL could have helped, but I didn't want to create any additional objects in the database. Also, I wanted to do something that I have never done before. Thus it came to Groovy.

First you need the JIRA Script Runner add-on (in my case it was already there). This add-on provides a Script Console in which you can code Groovy. It doesn't come with a handy IDE, but just a basic code editor. Serves the purpose.

If you execute the following one line piece of code there, you'll see how simple it is. It's based on Java, but lot more simpler to use. If you are scared of OOP like I used to be, here's your chance to practice by swimming in shallow freshwater.

"<h1>Hello World!</h1>";

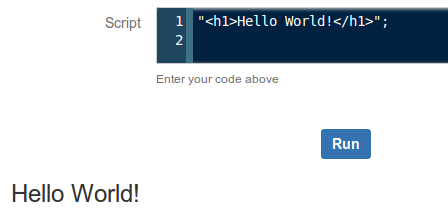
It will do neat HTML!

Here's the piece of code I wrote in Groovy. I'll explain how it serves the purpose as well.

import com.atlassian.jira.component.ComponentAccessor;
import com.atlassian.jira.issue.fields.layout.field.FieldLayoutManager;

log.setLevel(org.apache.log4j.Level.DEBUG);

FieldLayoutManager flm = ComponentAccessor.getComponent (FieldLayoutManager.class);

x = flm.getEditableFieldLayouts();
html = "< table>< tr>< th>Field Configuration< /th>< th>HashCode< /th>< /tr>";
x.each {
 l -> k = l.getName();
  v = l.getFieldLayoutItems().hashCode();
  html = html + "< tr>< td>" + k + "< /td>< td>" + v + "< /td>< /tr>";
}
html = html + "< /table>";

Edit: I've noticed that SyntaxHighlighter intermittently messing up with the HTML parts of the source code above. As a quick workaround I broke the HTML tags to avoid breaking the whole thing.

Alright, you got the fish, now here's how to fish. If you have a limited JIRA API knowledge like I do, it's better to start reading with the first two import lines. All you have to do is a Google search, entering the package name followed by "javadoc".

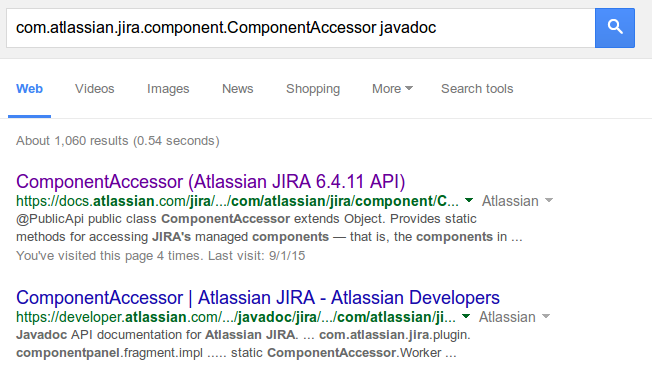
Image courtesy: Google Web Search

Everything seems neatly documented, right? How did I find that FieldLayoutManager package will give me the exact information I need? For that I had to do some keyword searches on the web, go up and down in the API documentation and read some of the package descriptions carefully to choose the correct one.

I (had already) learned that FieldConfiguration has a different meaning internally, and Field Configurations are internally called FieldLayouts. A FieldLayout has FieldLayoutItems, each item describes characteristics of a single JIRA/ custom field within its parent Field Configuration. The information I need here is a list of Field Configurations against aggregated list of each item's field characteristics for comparison. Initially I read through several interfaces under com.atlassian.jira.issue.fields.layout.field package, but with a little common sense I soon realized that FieldLayoutManager interface is going to give me the information I need (it manages the field layouts - so it might give me a list).

The next important line shows how you create a FieldLayoutManager object. See that's not the 'conventional Java way' which we learned at school but using the ComponentAccessor. This is something I learned from observing other developers' work, but the reasoning is out there in the JavaDoc.

Next, we use the getEditableFieldLayouts() method to get the list of all Field Configurations in the JIRA instance. As you can see in this line, you don't have to declare an array and then call the method. That's simplicity of Groovy. Now, the question is, what did it return? What's the value of x? According to the method specification of getEditableFieldLayout(), it's a List of EditableFieldLayout objects. In human readable terms, it's the list of Field Configurations in JIRA. Now we know the list of Field Configurations.

However, they don't come in pretty neat looking strings. They are still Java objects. Each Field Configuration returned is a Java object. We don't know what's inside yet. To see what's inside, I'd take a look at the JavaDoc of the EditableFieldLayout class. It has two methods that I'm interested in, one is getName(), which returns the human readable name of the Field Configuration. The next is, getFieldLayoutItems(), which returns a List of FieldLayoutItem objects. That is the list of fields with characteristics of each.

But now, this list inside list thing is getting deeper by one level, and do we really need to dig that deep? Here's the turning point. My original requirement was to find the duplicates. It doesn't mean that I should follow the same thing I attempted with Oracle. What I actually need is something against each Field Configuration's name that uniquely describes the entire Field Configuration.

This is where hashCode() method in Java comes to play. Every Java Object inherently gets this method. It generates a unique 32-bit hash of the object that is is invoked from. Whenever the object changes, the hash also changes. In this particular case, what we need is to hash the List of FieldLayoutItem objects of each Field Configuration.

With a little bit of HTML formatting to append the Field Configuration - Hash pairs into JIRA Script Console's page, we get a nice table which we can copy-paste into a spreadsheet program and then easily find the duplicate items. Two Field Configurations have the same hash means both Field Configurations are identical.

Example output:
Field ConfigurationHashCode
Default Field Configuration179968652
Copy of Copy of Default Field Configuration179968653
Copy of Default Field Configuration179968653
Copy of FC11290893968
FC1391319565

Just copy-paste the provided source code into your JIRA instance's Script Runner Console and see the results. Create a Field Configuration and execute again. Make a field mandatory in the new Field Configuration and then execute the script again to see that hash also changes. Revert back and the hash also changes to the previous value.

The piece of code I wrote here is not a big deal. I just took some effort to describe it to those who have a little coding knowledge. But see the beauty of results!

Before I wind up, here's a couple of things you'll need to know as a newbie Groovy programmer:
  • Executing .getClass().getName() method on any Java object returns the name of its constructor class. You can then google the classname followed by 'javadoc' to find all the information you need to know about that class, including available methods. This can be helpful when you work with any API you are not familiar with. With log.debug(), you can append this to the application log.
  • I recently read in a funny webcomic that today's computer programming is actually 'Googling the StackOverflow'. Most of the things you need are already out there. What you need is to get the parts together and 'assemble' in the proper manner. Most of the time all you need to have from your own is a clear idea of what you are going to achieve, and the way you are going to achieve it.
  • Although I started explaining the packages imported in the first two lines, the correct way to start writing your own script would be to find out the Java classes that represent the key objects that involve in your mission.
Coding improves your health, isn't it? Think how. Thanks for reading!

Save your day with JIRA AUI JavaScript Hacks

I've been a JIRA administrator for more than four years with the hope that time would permit me to blog anything about JIRA. Finally here it has come to that - my first blog post on JIRA administration!

So what I'm going to talk about today is how AUI JavaScript hacks can save a JIRA administrator's time and make his life easy.

AUI is an abbreviation for Atlassian User Interface Library. AUI JavaScript is actually a modified version of the famous JavaScript framework jQuery. Thus, the most of jQuery's official documentation works with AUI without a hassle.

Now, let me explain a case where AUI hacks can save you from cumbersome work.

Changing the workflow scheme of a JIRA project

It really frustrates me of when it comes to the status mapping part. I hate repetitive work. Especially when your JIRA project has a lot of issue types with a lot of Issues this step is a nightmare.

And this list repeats with all available issue types...
For simplicity, let's just assume all issue types follow the same workflow in the workflow scheme. Imagine your JIRA project has ten issue types and current workflow has ten statuses that do not exist in the new workflow. Then JIRA will give you 10 × 10 = 100 drop down lists to pick the new status mapping for each type-status. And it's a highly error prone when you do this by hand.

So how do we get through it in a 'hacker' way? Learning how to code is a worthy investment. :)

I’m using the Mozilla Firefox web browser with Firebug add-on here because it’s my familiar environment. But you can use vanilla Firefox or Chrome browser with pre-built development tools. First, when you are at the status mapping step, inspect a drop-down list using Firebug.


And then,


When you expand the HTML code for the select list, the HTML elements for the available options become visible. The value for each option is actually the ISSUESTATUS.ID column in JIRA database.

Looking at the structure of the page, jQuery's official documentation, AUI documentation you can quickly come up with a JavaScript code to change each drop down list's selected option to "In Progress" like this:

AJS.$('select option[value="3"]').attr('selected','selected');

The code says, "Make every drop down option who's value is 3 (In Progress) the selected option of its parent select element". Execute it in the Firebug script console and you can see all the drop down lists change their selection at once.


Now that was simple. Imagine you have discussed with the project stakeholders about how existing issue statuses should be mapped and agreed upon a mapping. For this example, let's take only two statuses.

Investigating --> In Progress
Verified --> Closed

Now, you can't use the above one line code because you want to 'filter off' old statuses other than "Investigating" before you change the values to "In Progress". Same applies to the "Verified" old status.

Don't panic. Let's just dig little deeper. If you carefully look at the "name" element of the select element we observed above, it says "mapping_1_10105". We have no idea what these numbers are for now, but with a little more inspection you will see in each drop down list where old status is "Investigating" the select element's name ends with 10105. (yes, it's very likely that status ID of "Investigating" is 10105)

Now, with a little more jQuery knowledge (read more about jQuery selectors), we can modify the above code as follows:

AJS.$('select[name$="_10105"] option[value="3"]').attr('selected','selected');

And for the "Verified" old status we can come up with something like this:

AJS.$('select[name$="_10101"] option[value="6"]').attr('selected','selected');

Just few lines of code and you're through a one cumbersome boring step with a big WOW! :)

Now, here's a question that some of my audience may ask:

What is the benefit of this whole process if you have spend more time on Firebugging and reading jQuery documentation than you could have just updated all entries by hand within a couple of minutes?
  • Because coding is so exciting and everyone should learn how to code. :)
  • Because this approach is less error prone. If your client or stakeholders are paranoid about data integrity, a wrong selection on a production environment can end up in a nightmare for real.
  • If you are doing data migration projects that have to do multiple rounds of testing and UAT, then this approach is a one time investment. You can save your code somewhere and reuse in each testing iteration. This ultimately saves a lot of time.

This blog post would have become unnecessarily long if I were to explain another case. So I won't be discussing more examples here. But AUI JavaScript is a cool thing to play with. Prepare your own evaluation instance of JIRA and you will see many ugly setups can be handled with simple pieces of JavaScript code. So play around, learn and share!

And to finish,... thanks for reading!


(The screenshots and examples used in this blog post do not reflect any of the JIRA setups I worked with at my previous or present places of work. All screenshots and examples are my own work on an evaluation instance of Atlassian JIRA)

How to Make a HelmetCam Using Your Nokia Smartphone

I have been a silent blogger for more than one year. It's actually one year and one month since I have published my last post on 10 January 2011. Things have changed a lot around me and now I'm not even using the Sony Ericsson phone mentioned in my last post!

Two things happened in the last year... on February I got a new phone as a gift from a friend, and on October I got a bike. That's it! Made in India, and called Hero Honda Hunk. It is said that this bike can topped to 112 km/h. For me that's not enough top speed, but this is one of the most stable bikes made in India. Most others waggle and vibrate, but Hunk is very stable at speed.


Due to the extreme excitement of the bike, I'd just forget to mention the phone! It's a Nokia 5230 and not that handy, but enough for my day-to-day activities. Same as most Nokia cameraphones, this one's camera is also not suitable for professional photography. But, its video recording is pretty good.

I really love to ride this Hunk... (despite of its gay name :-) ) it brings lots of excitement every time when it's over 100. Its stability at higher speeds, and stability when cornering, wheelies, stoppies... everything eventually tempted me to have a video collection of it. This is how I become interested in making a HelmetCam. I don't have much of equipments for this, and I've heard somewhere that a professional HelmetCam kit costs over US $200. So why not use my own cameraphone? Here, I'll explain how to get it prepared with a Symbian (Nokia) phone.

The simple setup is to wear your helmet, and then put the cameraphone in, and fasten it. This setup has a problem. Why? Whenever the touchscreen/ keypad hits your nose or somewhere in your face, there's a probability for video recording to interrupt. Or even it can dial emergency while you are on ride!

This is the time for SymDVR to shine. SymDVR is a very handy app which can turn your cameraphone into a DVR with lots of options. The main reason for using this app is, unlike your phone's in-built video recording application this allows you to lock the screen/ keypad while recording. This is a huge advantage as it also keeps the phone's backlight off while recording.


Other advantages include that it can calculate your riding speed using GPS and include as subtitles, landscape recording while keeping the phone in vertical position, etc.

Go to SymDVR homepage, download and install the app on your Nokia phone. Start the application, choose appropriate settings and start video recording. Once you start recording, you will see a Nokia Menu icon on the screen. Tap on it, and SymDVR will continue to record video, running in the background. Now it can be placed even inside your underwear without interrupting the record. :D

Be sure to have a strap for your phone. You can fasten the helmet's strap across phone's strap to make sure it's safe in case if your phone loosens inside the helmet and falls down on to the road. Other than that, the phone will fall onto the road making you distracted, eventually turning you into dead meat. If you don't have a strap, just go and buy. It won't cost much. This is important to avoid accidental distractions.
Image courtesy: fadbus.com


Now, we need to have is a full face helmet. We are going to need a full face helmet because then only it can be held between your face and the helmet.


If you plan to try this out in Sri Lanka, be sure to choose a helmet with a dark tinted visor. Most of the traffic cops are weird jerks, and if they see the cameraphone inside helmet they will remake the story as you were having a phone call while riding. (They just want you to invite them for a bribe). That's Sri Lankan traffic cops. So beware of them.

Firstly hold your phone vertically, and start recording on SymDVR. Then click on Nokia Menu icon to allow SymDVR to run in background, and lock the screen/ keypad. Even if you hold it vertically, SymDVR will record the video clip in landscape mode without having you to flip the phone, and without affecting the clip size.Then, while wearing the helmet, place the cameraphone in the helmet in the way shown in the photo below. It will fit between your face and the helmet.  Finally, cross the straps as described above.

In this setup, cameraphone fits between my face and helmet.


Make sure that your sight is not disturbed by the position of the camera. Letting it cover one eye and seeing the road by the other is prone for accidents. You need your both eyes to get the correct idea of distance to other vehicles on the road. If you still unsure why, read more about depth perception.

If it doesn't fit into your helmet you will have to find a workaround. A good suggestion that I have seen over the Internet is to use Velcro, but the problem is that you will have glue it onto the phone. :-/

Another suggestion of is to use a phone holder such as Nokia CR-119. You will have to remove the cone shaped part which in normal use attaches to a vehicle windshield. Carefully mount the phone into the holder facing the camera out. This arrangement will take more space inside the helmet, and it will fit better if your head is small. :-)

Make sure that camera is facing directly front. Start your ride, bang all over the city. Forget about the phone and enjoy your ride as much as possible.

A great feature that I really love on SymDVR is that it can measure your speed using GPS. This can be different from the actual speed , plus or minus 2 km/h, but with this feature on you don't have to look at the speedometer to get the speed on video. It also helps a lot to avoid distraction. Speed is recorded in a separate subtitle file (srt), and later you can use a video encoding software to merge it with the video file.

Once you are done, take the phone out, and open up SymDVR. Properly stop recording or otherwise you will end up with a corrupted video file. It will take a moment for the video file to be prepared. Once done, you can connect the phone to PC in Mass Storage Mode, and transfer the video file to your PC. It's in \SymDVR\ directory on your phone's memory card. This is by default hidden if you are using Windows on your PC.

After recording if you want to embed subtitles into the video, I recommend using mencoder. If you just want to trim the video file, you can use ffmpeg to get it done without affecting the video quality.


I have done some helmetcam videos using this setup. And.... here goes my first performing a stoppie somewhere near the end.........


And another I took at Malabe...


Well,... finally that's it! Thanks for reading.
Enjoy!!

Jaffna Tour (10/09/2010 to 12/09/2010)

If you've read my last post you'll find that I had a trip to Jaffna. Yes, it was last month, but I had nothing to do other than waiting for my internet connection to be restored. Sad. :( Early in the last month, our ADSL router seemed not working properly. So we handed it over to claim warranty. This caused me miss some important events including few career opportunities. I tried to use my mobile phone to connect, but it also failed. Although Airtel provides a very attractive and pleasing 'Youth Pack', no chance for us to use at least 100 MB of the 400 MB data bundle -- no 3G connectivity. I live in Ambalangoda, a well known coastal urban area in Sri Lanka, and I don't know why would such a big telecommunication service provider fail to offer a satisfactory service.

However, things are now OK as we got the router back yesterday evening. :)

---

Okey,... let's get back to the topic -- Jaffna. I had a chance to join a group of devotees who were on their way to Nainativu. For a person living in the Southern Province it's a fairly cheap travel to Jaffna. Since I'm a novice photographer I wanted to make this a chance to enjoy the art of photography also. So,... my K770i was back in action, althogh it has begun malfunctioning a bit. Here's the journey... (please click on each image to enlarge)


Turbine of Iranamadu power plant which was built by the LTTE.


This little guy seemed not ready to leave his pals at the camp.


Kilinochchi water tower which was destroyed by the LTTE.


A panorama of A9 highway at Elephant Pass. Camera is aimed along the way South.


Monument for the legendary hero of Hasalaka, Corporal Gamini Kularatne. [read story]


A pet aligator kept at a military camp, somewhere I don't exactly remember.


Nallur Kovil, Jaffna


Interior frescoes at Naga Vihara, Jaffna.


The narrow road from the peninsula to an island.
If my memory is correct this is the way to Mandativu, as we were heading to Nainativu.


Prawn traps set in the lagoon


Way to the boatyard. Boats are used as the transportation means to Nainativu (Naga Deepa).


The lord settling up the dispute between Chulodara and Mahodara [read story]


Cattles!
(I took this one sitting on the foot-board of the bus,
and I was not able to properly aim the camera with just one hand.
Also the bus was moving at a speed)


Lieutenant General Denzil Kobbekaduwa monument [read story]


Thewarikkulam tank - uncommon, but it was somewhere near the rest house.


Remainders of a/the railroad?


Dagabas at Kadurugoda Ancient Vihara - a landmark that you should visit!


Bhikkhuni (nun) Sangamitta statue


Statues at Naguleswaram Kovil


Cultivation in Jaffna


Nilavarai water well - a natural well believed to have no bottom
This is the last landmark we could vi
sit during the tour


The danger zone
Landmines are not yet 100% cleared in Muhamalai.
As you can see in the photo, only the narrow area surrounded by the ribbon is safe.
This is almost aside along the A9 highway.


The Monument of Victory!


Dignity of the LIONS... towards the infinity...!


I have many more. Not all are worthy shots, but I've kept them because I believe that in any particular graphic any viewer other than myself may see something that I may never see. They're available to download.


---

Since sunlight is too heavy in the North province, lighting quality of raw photographs were poor. Even automatic white balance settings in my camera didn't work. So I had to do some post-fixes such as curves and levels, with the use of GIMP 2.6 software. This is something usually I don't like to do becuse I believe that the photographer must retain the original lighting conditions whenever possible; simply because photography is the art of capturing light.

Overall I'm not satisfied with my photography experience during this tour. I even missed several 24k shots. If you're a reader of my Sinhala blog, you could know that I had a wondeful experience in our tour last year. This time it was with a group of devotees and the tour was to worship Nainativu and some other religious activities. No no time to wait and capture light... what do do? :(

Okey... thanks for reading! Have a great time!!


PS:
If you use Airtel be sure to keep your phone in 'Flight mode' to save battery. Your Airtel SIM will act as a world class dumb SIM, as it is required for nothing but keeping few other phone functionalities other than communication. X(  

K770i, Photography and Sorting Problem


Hi fellas, after few days... I'm back again with some cool cool stuff. My internship is over... and now I look for new career opportunities. Anyhow, I was not so quick to apply for a new job like others did. After completing my internship, I wanted a 'free time' of just one or two weeks to have a tour around Sri Lanka.

So, I just had the tour. Amazingly, it was to Jaffna. I live in  Southern Province and going for a tour in Jaffna is just a daydream for a busy man. However, in any tour I have two main intentions, photography and flirting :P . (however I was not able to photograph her since her mom was there :-O )

I have been using a Sony Ericsson K770i phone for more than one year and that phone has made me a photography freak. But recently, it had encountered a problem with it's memory stick reader compartment. This really made me upset as my phone now can't read memory sticks. However, by deleting some wallpapers, ringtones, themes and midlets I managed to make some free space of 15 MB in the phone's internal memory. This is just enough for 15 photos at maximum possible quality. Sad! :(

Luckily I found another phone (a Chinese phone without a brand) which had a memory stick installed and bluetooth also. So my plan was to transfer photos into the Chinese phone over bluetooth after taking each 15 photographs, and delete originals to make free space on my phone for new photos... just like using a revolver ;) . It worked, but since bluetooth file transfer took longer than expected each time I missed few imoprtant shots as well. :(


Sony Cyber-shot cameras use a specific file naming convention. It's the DSC (Digital Still Camera) prefix before the five-digit file number (i.e. DSC00001.JPG, DSC00002.JPG, ...). Due to my 'revolver methodology' sometimes when I make free space my phone seemed to reset the file number. This resulted duplicate filenames, and upon transfer those duplicates were added a Dup(xx) prefix in their filenames. However, thanks to the Chinese phone, during the three days of tour I have been able to take nearly 300 photos, including few panoramas.

After coming home I wanted to arrange all the photos in the correct timeline. Since file naming has already been messed up it was no use arranging them by name. So the next chance is to arrange them by the modification time (unix mtime). Due to some unknown reason, there were some small misconjusnctions in the series when arranging by mtime. It was like Elephant Pass coming before Kilinochchi when heading to Jaffna. :P

So here comes the sorting problem... it's not the Sorting Problem that we learn at the computer science lecture, although we use the tools built upon those theories. I realized that playing with ctime, mtime and atime is just a waste of time... so I was looking for another solution. Yes!, there is. It's the Exif data stored with each file. I can extract the DateTimeOriginal tag from Exif and arrange the file accordingly. I am a Linux geek, so rather than doing a web search for an automated GUI tool  I wanted to do it by myself.

So my ultimate plan was to write a bash script that will check date-time from each file and rename them in the correct order. Also, I wanted them to follow the same DSC convention. There's a handy command line tool for reading image exif on Linux. It's exifprobe. Just an apt-get install is enough to get it installed on the computer. With exifprobe we have another handy tool called exifgrep. Now let us go ahead.

Here we extract the origianal date-time:
$ exifgrep -n DateTimeOriginal DSC00001.JPG

and the output will look like,
JPEG.APP1.Ifd0.Exif.DateTimeOriginal = '2010:09:10 12:04:16'    # DSC00001.JPG:

What I want to do is to list each file against it's OriginalDateTime and then sort with Unix sort command. So it's just one more simple step, (I wanted the output in a text file too)

$ exifgrep -n DateTimeOriginal *.JPG | sort > sorted.txt

Here's a random portion of the output I got,

JPEG.APP1.Ifd0.Exif.DateTimeOriginal = '2010:09:11 12:18:54'    # Dup(01)DSC00046.JPG:
JPEG.APP1.Ifd0.Exif.DateTimeOriginal = '2010:09:11 12:20:39'    # DSC00048.JPG:
JPEG.APP1.Ifd0.Exif.DateTimeOriginal = '2010:09:11 12:23:13'    # Dup(01)DSC00052.JPG:
JPEG.APP1.Ifd0.Exif.DateTimeOriginal = '2010:09:11 13:31:30'    # DSC00001.JPG:
JPEG.APP1.Ifd0.Exif.DateTimeOriginal = '2010:09:11 13:31:49'    # DSC00002.JPG:
JPEG.APP1.Ifd0.Exif.DateTimeOriginal = '2010:09:11 13:32:38'    # DSC00003.JPG:
JPEG.APP1.Ifd0.Exif.DateTimeOriginal = '2010:09:11 13:34:07'    # Dup(01)DSC00004.JPG:
JPEG.APP1.Ifd0.Exif.DateTimeOriginal = '2010:09:11 13:48:40'    # DSC00007.JPG:
JPEG.APP1.Ifd0.Exif.DateTimeOriginal = '2010:09:11 14:01:13'    # Dup(02)DSC00008.JPG:
JPEG.APP1.Ifd0.Exif.DateTimeOriginal = '2010:09:11 14:24:49'    # Dup(01)DSC00014.JPG:
JPEG.APP1.Ifd0.Exif.DateTimeOriginal = '2010:09:11 14:25:43'    # Dup(02)DSC00015.JPG:

Now, it's the time to write the actual shell script. It's not a big deal actually, as you can see, so I don't need to explain.
#!/bin/bash

mkdir sorted
lines=`cat sorted.txt | wc -l`
for (( line=1; line<=$lines; line++ ))
do
  src=`cat sorted.txt | head -$line | tail -1 | awk '{ print $6 }' | cut -d: -f1`
  dest="DSC"`printf "%05d\n" $line`".JPG"
  cp $src sorted/$dest -v
done

Finally, after running this script I managed to get all photographs according to the timeline. I'll be writing a note about my Jaffna tour as soon as possible, and will be releasing some photographs under the Creative Commons Attribution-Share Alike 3.0 Unported license.

Few of them (such as File:JaffnaPeninsula.JPG) are already available on Wikipedia! :-)

See also:
Thanks for reading... have a nice day! :) :) :)

Tangalle, Sri Lanka – 16/Feb/2010

Hi folks, since I wrote my last post on a malware attack that I had to defend, still didn't find any interesting technological stuff to work on. So no blogging. :( Also, I was so busy with examination at UCSC,... ohh I hate cramming and re-writing stuff! :-S

Anyway, there's a good news too. Our internships begin this semester. I have been able to pass my very first job interview and now I'm about to go for my very first job! :) It's gonna start on 2nd of March and I wonder whether time would permit me for more blogging since the start. :|

By the time, on 16th, I had a visit to a one of my relatives living in Tangalle. We spent most of that day at beach, and I have been able to take some remarkable captures with my K770i. Photography has become one of my hobbies since the day I bought my phone. ;) Hell yeah, it's an amazing beach in Sri Lanka.

So I thought of sharing my captres with the World. All photos are available under the Creative Commons Attribute-Share Alike 3.0 Unported license. Some will appear in this post, and everything is available for download.

---
Please click on the images to see full resolution.

sea shells

clear seawater

an urchin - not so away from the shore


sunlight, urchin, and the rock - i put one on the rock and took this..

a common bivalve mollusc often served as food in sri lanka
however i don't know a proper name, just know the taste :P may be it's blue mussels?

coast - you can see fishermen's boats

fishermen launching the boat that carries large seine for fishing

---

Had a nice and remarkable day,... and here's the download link for the entire collection (63 photos). And... one more thing to promote my beloved open source software... photo editing was done using GIMP on Ubuntu. :)


Thanks for reading!

Invoke Google's Web Search from Bash

Nice ideas come in handy way :) ; invoke Google's web search from your Linux desktop shell! :-O

Here's a small shell script that I wrote couple of minutes ago. Copy-paste it into a new file, save it inside /usr/bin as google. This works in GUI mode with firefox very well, but it doesn't work with lynx. I still could not find any reason,.. may be somebody can come up with an idea.

if [ $# -ne 0 ]
then
  query="http://www.google.lk/#hl=en&q="
  for i in $@
  do
    query=$query$i+
  done
  firefox $query &
else
  echo "Usage: google <your search query>."
fi


Then chmod +x /usr/bin/google as root to make it executable.

Now, enter the following as a command and see: B-)

$ google shaakunthala

Or,

Just press Alt+F2, type google shaakunthala and press Enter.


You can use whatever as your keyword. But, have to follow usual bash (shell) syntax.

For example,
If your query is sameera shaakunthala, your command should be,
$ google sameera shaakunthala

If your query is shaakunthala's portal, your command should be,
$ google shaakunthala\'s portal

If your query is "shaakunthala's portal", your command should be,
$ google "\"shaakunthala\'s portal\""

... and so on.

And use your creativity and combine this with some google search hacks that you know. It can be a powerful web search command from your desktop! :-O

Bye! Ciao! Sweet dreams! :P


*** Update ***

I re-wrote the script for lynx. The problem arises with the hash (#)sign in the URL. So I removed it. The whole thing is more convenient in the command line, than in the GUI mode.

if [ $# -ne 0 ]
then
  query="http://www.google.lk/search?hl=en&q="
  for i in $@
  do
    query=$query$i+
  done
  lynx -accept_all_cookies $query
else
  echo "Usage: google <your search query>."
fi

Here's the code explanation (how it works):
When you execute the script with some arguments, it will concatenate all arguments with plus sign (+) in between. This is necessary to parse the input as web browser URL format. Then it will concatenate it to the Google search URL string to pass it to the server script at Google.

And finally pass the whole thing as an argument to your web browser.

if - then - else - fi : Decision making
$# : Total number of arguements passed to the shell
-ne : not equals
for - do - done : Looping
$@ : all the arguments (except the command itself) passed to the shell

Ciao! :)

MP3 Batch Transcoding with Linux


Well, hello there; after some time... this one is about some small work I've done, that I think usful for other Linux users.

 I'm huge fan of music -- especially hard rock and thrash metal. I feel almost dead if I don't get a chance at least once a day, to listen to them. So I wanted to put my huge collection into my mobile phone's memory chip so I can carry them anywhere I go. But, my poor memory chip is just 1 GB. It's not enough at all! So, the only way to pack as much as I can is, reduce the bitrate of the MP3 files.

The next problem... I don't use Windows, nor Windows based software. But, if occurs a situation where I don't have any chance with Linux, I have installed Windows inside a virtual machine for use. But I rarely use that. Of course I can use JetAudio or any other audio conver to do this easily, but, as a professional and permanent Linux user, that's not my style.

So I asked our smart genie... Google to find out a solution. Here's what I've got:
#!/bin/bash
for file in `ls`
do
file=`echo $file | sed s/\ /_/g`
echo $file
lame --decode $file
lame -b 128 $file.wav
rm $file
rm $file.wav
mv $file.wav.mp3 $file
done

http://www.linuxquestions.org/questions/linux-software-2/reduce-mp3-bitrate-336791/

It's a shell script for batch processing. It will process all the MP3 files inside a given directory. Yes, that's more than what I wanted, but, what would happen if filenames contain whitespaces? The solution is not much practical, because most MP3s we get contains at least one whitespace in filename. I don't have time to rename each and every file. So I wsa thinking about a suitable solution.

It is based on lame encoder, if you don't have it, please install it first.
# apt-get install lame

Yes, the find command! Got that!!! Here's the code I've wrote:
Copy this into a text file (mp3enc.sh).

if [ $# -eq 2 ]
then
mkdir $1/output
cd $1
find . -maxdepth 1 -exec lame -h -b $2 {} ./output/{}  \;
else
echo "Invalid arguements, please refer http://portal.shaakunthala.com/2009/10/mp3-batch-transcoding-with-linux.html"
fi

Then execute,
$ chmod +x mp3enc.sh

Now run it,
$ ./mp3enc.sh <mp3_files_directory> <target_bitrate_kbps>

Eg:
$ ./mp3enc.sh /home/ubuntu/Music/MyMusic 128

It will make a directory called output inside your music directory, and put the encoded files in.

It's simple as that! I think it's easier than JetAudio, isn't it? ;)

Windows 7 on Jaunty

I'm just about to install Windows 7 inside a virtual machine on Jaunty (Ubuntu 9.04). I allocated 512 MB of RAM for the virtual machine. I don't know whether it would be enough. I'm not sure whether I would be able to do it.

Recently I switched to Ubuntu, but because of in some cases I would still need Windows, I decided to install Windows XP inside a virtual machine managed by VirtualBox. The VM in following screenshots is made for Windows XP, but I'm tring out Windows 7.

However, here are the screenshots...


Windows 7 on Ubuntu 9.04


VM named Windows XP, but actually runs Windows 7

Rip GTA Vice City Radio Stations

First of all, let me tell you why I'm afrer Vice City this much. I like the story, I' enthusiastic about the 80's style, I like the music, and many more reasons. I have played many other games, and I have played other releases of GTA as well but none of them were able to keep me addicted.

Are you a fan of GTA Vice City radio stations? I am. My favourite is Flash FM. (That's because I love the song by Wang Chung, Dance Hall Days, Jackson's Billie Jean, INXS' Kiss the Dirt... etcetera etcetera......... ;) )

So I wanted a way to keep these radio stations after the removing the game from my computer. After switching to Linux in few more days, I may not be able to install Vice City. So, after doing some googling, I found a nice way to rip thoese stations.

Each radio station is a single file and stored in Vice_City_Installation_Directory\Audio\ directory with *.adf file extension. These files cannot be opened with any known media player software.

Actually these adf files are a kind of special archive files. We need an unpacker to unpack these archives and rip the audio tracks inside. That software is called Dragon Unpacker, a handy open source software tool. Just open each adf file with Dragon Unpacker, and you can see an MP3 file inside each. Just right click it and select the option to extract files without any conversion.

And that's all! Enjoy!!

Doghouse

This guy is really happy with his apartments inside the canoe...


Location: Tangalle, Sri Lanka

Followers

Subscription Options

 Subscribe in a reader

or

Enter your email address:

and
to inscrease

and make me happy. :)

Other Blogs by the Author

The Author

www.flickr.com
ශාකුන්තල | Shaakunthala's items Go to ශාකුන්තල | Shaakunthala's photostream
free counters
TopOfBlogs
Related Posts with Thumbnails